

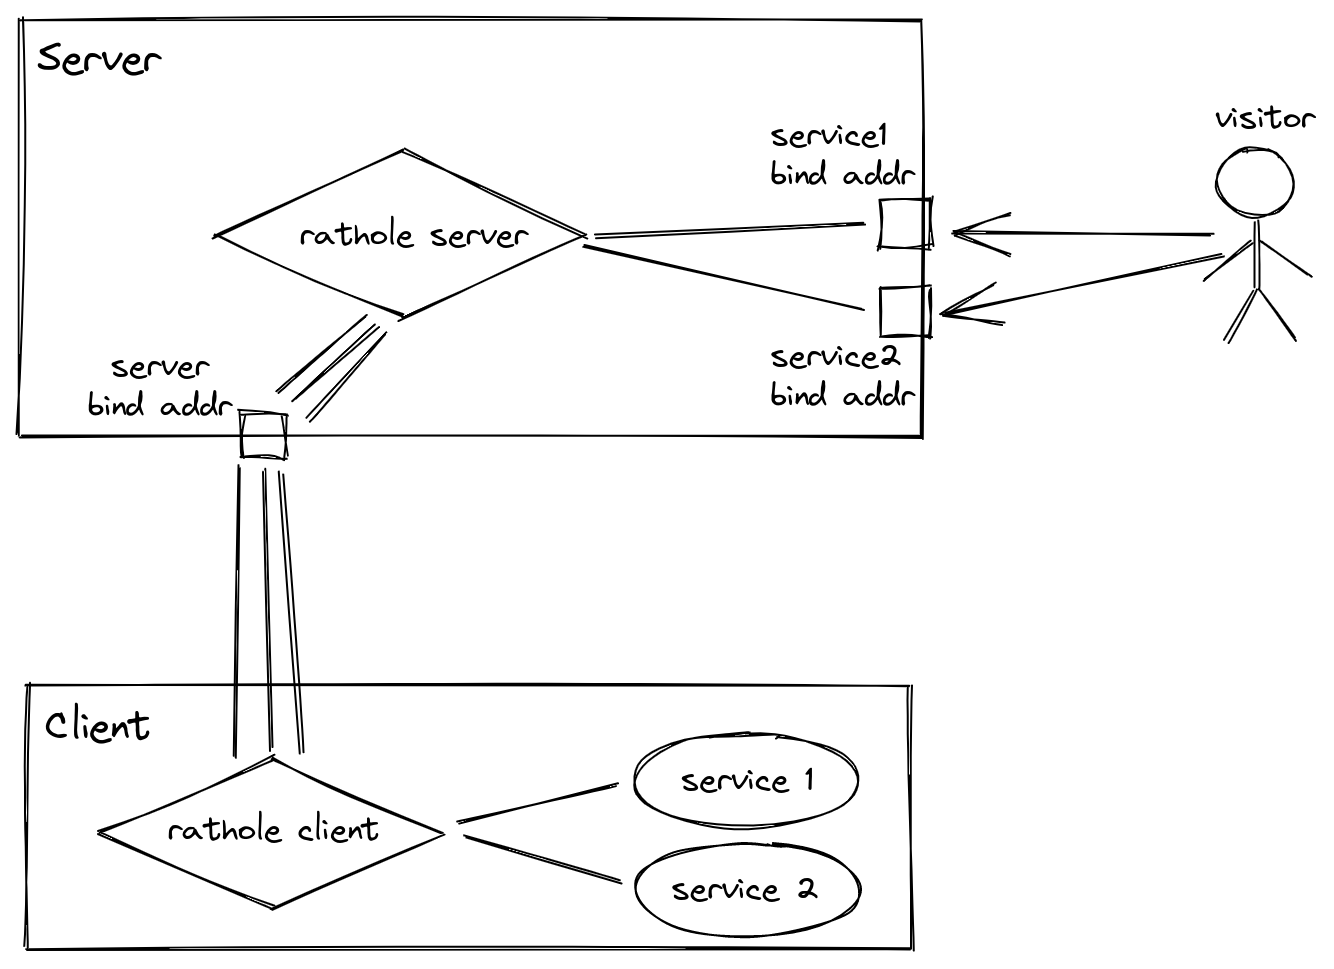
rathole (lack of capitalization is intentional) is a secure, stable and high-performance reverse proxy for NAT traversal, written in Rust. It can help to expose the service on the device behind the NAT to the Internet, via a server with a public IP.
Prerequisites
- A lightweight VPS with at least 512 MB memory, 1 CPU core, high/unlimited transfer allowance and decent speed.
- At least one machine inside LAN with rathole binary.
- rathole binary on the VPS.
- DNS A records of your domain(s) or subdomain(s) pointed at the IP of the VPS; one per service.
- Reverse proxy of your choice on the VPS. Caddy will be used in this example.
- Your preferred method of obtaining TLS certificates for your (sub)domain(s). Caddy will automatically obtain them in this example.
Download the latest version of rathole on the local machine and the VPS:
wget https://github.com/rapiz1/rathole/releases/latest/download/rathole-x86_64-unknown-linux-gnu.zip

unzip rathole-x86_64-unknown-linux-gnu.zip

chmod +x ./rathole

mv rathole /usr/local/bin/

rm rathole-x86_64-unknown-linux-gnu.zipRun rathole --genkey x25519 to generate keypairs on both the local machine and server. We'll copy them from the terminal history later.
## server side
Private Key:
uO3qkGhfId7josk54IkksbbDn3iLysq77ty2bPOiFXA=

Public Key:
bnXjhbLKrzKR4gjTr+DdYlalu7mvqT/QQtCur6DEnyo=

## client side
Private Key:
CJHbyVBCnIFXW9zz4kTvrQQWJfo0257MDYpq0KqaPlI=

Public Key:
sKDWEizIaVtZb+6VVcrab5KRgFuTbOnMJgnNSj/e4TM=Create a directory to store config files on both the local machine and server: mkdir /etc/rathole.
Configure the server:
In this example we'll proxy WireGuard server and Home Assistant. I have WireGuard listening on port 59509 and Home Assistant on port 8123. This is what my rathole config would look like on the VPS:
[server]
bind_addr = "123.123.123.123:1234"
default_token = "iJT5nWLo6fYI8zMxHPeDE7ok"

[server.transport]
type = "noise"

[server.transport.noise]
pattern = "Noise_KK_25519_ChaChaPoly_BLAKE2s"
local_private_key = "uO3qkGhfId7josk54IkksbbDn3iLysq77ty2bPOiFXA="
remote_public_key = "sKDWEizIaVtZb+6VVcrab5KRgFuTbOnMJgnNSj/e4TM="

[server.services.hassio]
bind_addr = "127.0.0.1:32625"

[server.services.wg]
bind_addr = "0.0.0.0:28827"
type = "udp"
The local_private_key is the private key generated on the VPS and remote_public_key is the public key generated on the local machine.
Replace 123.123.123.123 with the IP address of the VPS and 1234 with a random port number.
We're binding Home Assistant to 127.0.0.1 because we want it accessible only through Caddy.
The default type is tcp so it does not have to be explicitly mentioned for HTTP(S) traffic. For WireGuard we do have to mention it.
We're binding WireGuard on all interfaces (0.0.0.0) so it's accessible directly via the IP of the VPS.
The service ports don't have to be the same between the VPS and local network.
default_token can be any random string. This will be shared between client and server.
Save your config at /etc/rathole/rathole.toml.
Now let's test it: rathole -s /etc/rathole/rathole.toml
If you see no errors, we can move on to creating a service file so it automatically runs at boot.
We'll create a service file at /etc/systemd/system/rathole.service with the following content:
[Unit]
Description=Rathole Server Service
After=network.target

[Service]
Type=simple
Restart=on-failure
RestartSec=5s
ExecStart=/usr/local/bin/rathole -s /etc/rathole/rathole.toml
LimitNOFILE=1048576

[Install]
WantedBy=multi-user.target
We'll then reload systemd: systemctl daemon-reload.
Start rathole service: systemctl start rathole.service.
And enable it: systemctl enable rathole.service.
Configure the local machine:
Corresponding client-side config would look like this:
[client]
remote_addr = "123.123.123.123:1234"
default_token = "iJT5nWLo6fYI8zMxHPeDE7ok"

[client.transport]
type = "noise"

[client.transport.noise]
pattern = "Noise_KK_25519_ChaChaPoly_BLAKE2s"
local_private_key = "CJHbyVBCnIFXW9zz4kTvrQQWJfo0257MDYpq0KqaPlI="
remote_public_key = "bnXjhbLKrzKR4gjTr+DdYlalu7mvqT/QQtCur6DEnyo="

[client.services.hassio]
local_addr = "localhost:8123"

[client.services.wg]
local_addr = "localhost:59509"
type = "udp"
The local_private_key is the private key generated on the local machine and remote_public_key is the public key generated on the VPS.
Save your config at /etc/rathole/rathole.toml. Then test it: rathole -c /etc/rathole/rathole.toml.
If you see Control channel established, you've configured everything correctly so far. Let's create the service file.
Create a service file at /etc/systemd/system/rathole.service with the following content:
[Unit]
Description=Rathole Client Service
After=network.target

[Service]
Type=simple
DynamicUser=yes
Restart=on-failure
RestartSec=5s
ExecStart=/usr/local/bin/rathole -c /etc/rathole/rathole.toml
LimitNOFILE=1048576

[Install]
WantedBy=multi-user.target
Reload systemd, start service and enable service the same way as on the VPS.
Both the server and client rathole services will automatically start on boot.
Caddy configuration:
Install Caddy.
Edit configuration file at /etc/caddy/Caddyfile:
hass.doma.in {
    reverse_proxy localhost:32625
}
Use your own sub.doma.in.
Restart Caddy: systemctl restart caddy.service.
Home Assistant should now be accessible at hass.doma.in with valid TLS certificates and WireGuard should be accessible at the IP of the VPS (or any subdomain pointed at VPS) at port 28827.
Conclusion
To add more services simply use the Home Assistant section as a template and replace the port number with the correct one and change the service name; hassio with any unique name (without spaces).
Happy tunneling!


Discussion