

Reverse Proxy plays an essential roll in exposing your services to the internet. Let's take a look at what it is and how it's done.
This is NOT a guide. It brushes over security a lot, but it gives a very good idea of what a reverse proxy does. And I'm also simplifying to get my point across.
Introduction
First of all, I believe you should understand how web browsing works.
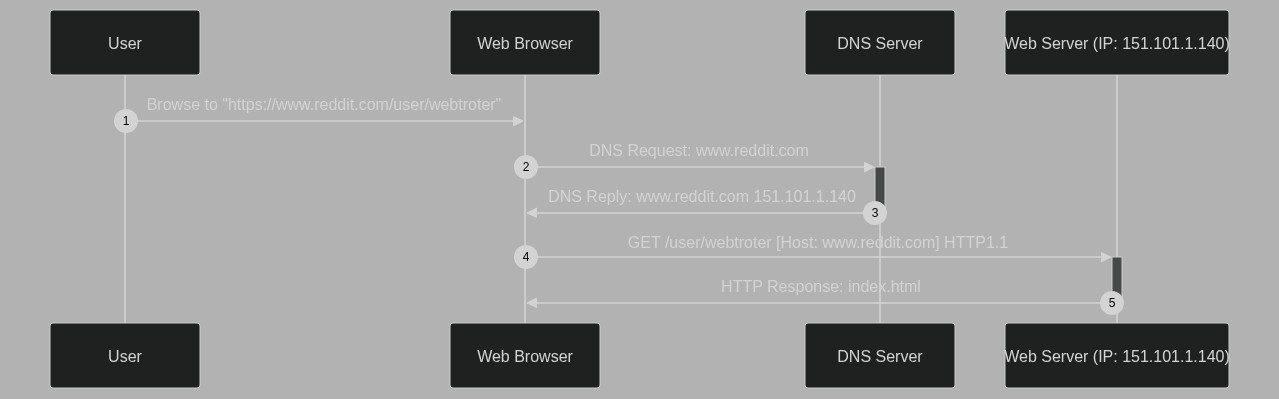
Let's say you want to go to https://www.reddit.com/user/webtroter. This "address" is in fact an URI (and URL). There's three "important" part to identify in this URI : the scheme (protocol), the host (the server address, a Fully Qualified Domain Name (FQDN), usually), and the path (location).
So you enter this URI in your browser. What happens next? First, the browser will try to find the IP address associated to the FQDN. In our case, the domain is www.reddit.com. The DNS server will reply with one or many IP address (that's simplified a bit), and your browser will choose one (semi-randomly). As an example, I will use the IP 151.101.1.140. Next, your browser will connect to that IP address, and send the first HTTP request.
That HTTP request asks the server for the page at the location specified in the URL (in our case /user/webtroter), but it also specify for which "host" the request is for. Because a webserver can serve many website, it need to know from the HTTP request which website is being served. This is specified in the Host header in the HTTP headers section of an HTTP request.
Detailed Explanation of a simple HTTP Request
Here is a sequence diagram for a simple HTTP request. I will refer to it in this section. I will ignore the fact that the request is made with HTTPS, let's keep things simple.
Network communication Layers (OSI and TCP/IP)

Network communications can be imagined as envelopes inside envelopes.
Layer 1 and 2
The layer 1 and 2 envelope is related to the interface. Layer 1 is the physical, so that's the electron pulses that are going in the Ethernet cable. If you know what a MAC address is, well that's the layer 2.
But those layers are not really interesting to us, since it's at the interface level. It's basically the outside-most envelopes. If you were to look at one of those envelopes (actually called packets or frame), you will usually see a source and destination (the header), and inside the packet is the payload. At this level, the source is your computer/phone and the destination is the wifi router.
Inside the payload we find the IP envelope/packet
Layer 3 - IP
Let's look at the sequence #4 (HTTP1.1 GET /user/webtroter)
On the header of the envelope/packet, we can see a source IP (your phone IP or home internet IP) and a destination IP. This destination IP was "found" using a DNS request for www.reddit.com.
The IP header have much more details, but it is not really important to us.
Example: Internet Protocol Version 4, Src: 145.254.160.237, Dst: 151.101.1.140
Inside the IP packet we find the TCP (or UDP, or other) packet.
Layer 4 - TCP/UDP
This is the layer when the port number matters. By default, the port for HTTP is tcp/80 and for HTTPS it is tcp/443.
So on the TCP packet, we have a source port and a destination port. TCP also does some magic, but we don't need to talk about that today. What is important is the destination port. The source port is usually random and very high.
Example: Transmission Control Protocol, Src Port: 38475, Dst Port: http (80), Seq: 1, Ack: 1, Len: 479
Finally, inside the envelope we find the HTTP packet
Layer 5-6-7 - HTTP
This is where we finally request a webpage.
This packet is a little bit more complex, but for this explanation, we will look at the request itself and the Host header.
Example:
Hypertext Transfer  Protocol
	GET /user/webtroter HTTP1.1
	Host: www.reddit.com
You can see that we request from the webserver the file at /user/webtroter, for the website www.reddit.com. The webserver has no idea about the information contained in the upper layers (for example, it doesn't know the source port, or even the destination IP), this is why the Host header is important.
Full picture
For a request for https://www.reddit.com/user/webtroter
IP Packet {
	SRC: 145.254.160.237
	DST: 151.101.1.140
	Payload: TCP Packet {
		SRC Port: 34867
		DST Port: 80
		Payload: HTTP Packet {
			GET /user/webtroter HTTP1.1
			Host: www.reddit.com
		}
	}
}
Example with a custom port
Let's say you have a webserver, listening on port tcp/8080, and you are exposing that port to the world. For this example, it is a webserver with a public IP, so the exposed port is exposed to the world wide web.
So in your browser you ask for the following URI : http://myserver.example.com:8080/index.html
The first thing that happens is that your browser will try to resolve the host part of the URI. The host part being myserver.example.com, we ask the DNS Server for the IP associated with that domain/FQDN.
Why there's no port in the DNS request? Well, DNS replies with an IP (layer 3) whereas the port information is purely layer 4.
After the DNS resolution, the URI can be imagined being like this : http://69.42.0.69:8080/index.html
Now we can send the HTTP request to the web server. The request will look like this :
IP Packet {
	SRC: 145.254.160.237
	DST: 69.42.0.69
	Payload: TCP Packet {
		SRC Port: 39388
		DST Port: 8080
		Payload: HTTP Packet {
			GET /index.html HTTP1.1
			Host: myserver.example.com
		}
	}
}
Home Server Hosting
First, I'll explain a problem. You want to host many web services in your homelab. Like most of us, you have a normal residential Internet service. Your Internet Service Provider allocates you with one IP address (that very probably changes from time to time, but let's not worry about that). I will call this IP address your WAN IP and it will be 69.42.0.69 for our example. You have one webserver setup in your network with the IP address 192.168.0.69.
DNS Detail
You have bought the domain example.com. And you have configured the DNS server with an A record so that myserver.example.com resolves to 69.42.0.69, your WAN IP.
Note
I will ignore the split-horizon DNS problem for now (details about that at the end, probably). So all the clients are doing requests from outside the home network.
Port Forwarding (D-NAT)
The real name for port forwarding is Destination NAT (D-NAT). NAT means Network Address Translation.
But don't let the name fool you, the D-NAT function can also do Port Address Translation (PAT)
So you configure D-NAT so that if a packet arrives at your router WAN IP at port 80, it should forward the packet to your webserver (and change the DST IP in the IP packet), not changing the destination port.
NAT Example
IP Packet {
	SRC: 145.254.160.237
	DST: 69.42.0.69
	Payload: TCP Packet {
		SRC Port: 48384
		DST Port: 80
		Payload: {...}
	}
}
becomes
IP Packet {
	SRC: 145.254.160.237
	DST: 192.168.0.69
	Payload: TCP Packet {
		SRC Port: 48384
		DST Port: 80
		Payload: {...}
	}
}
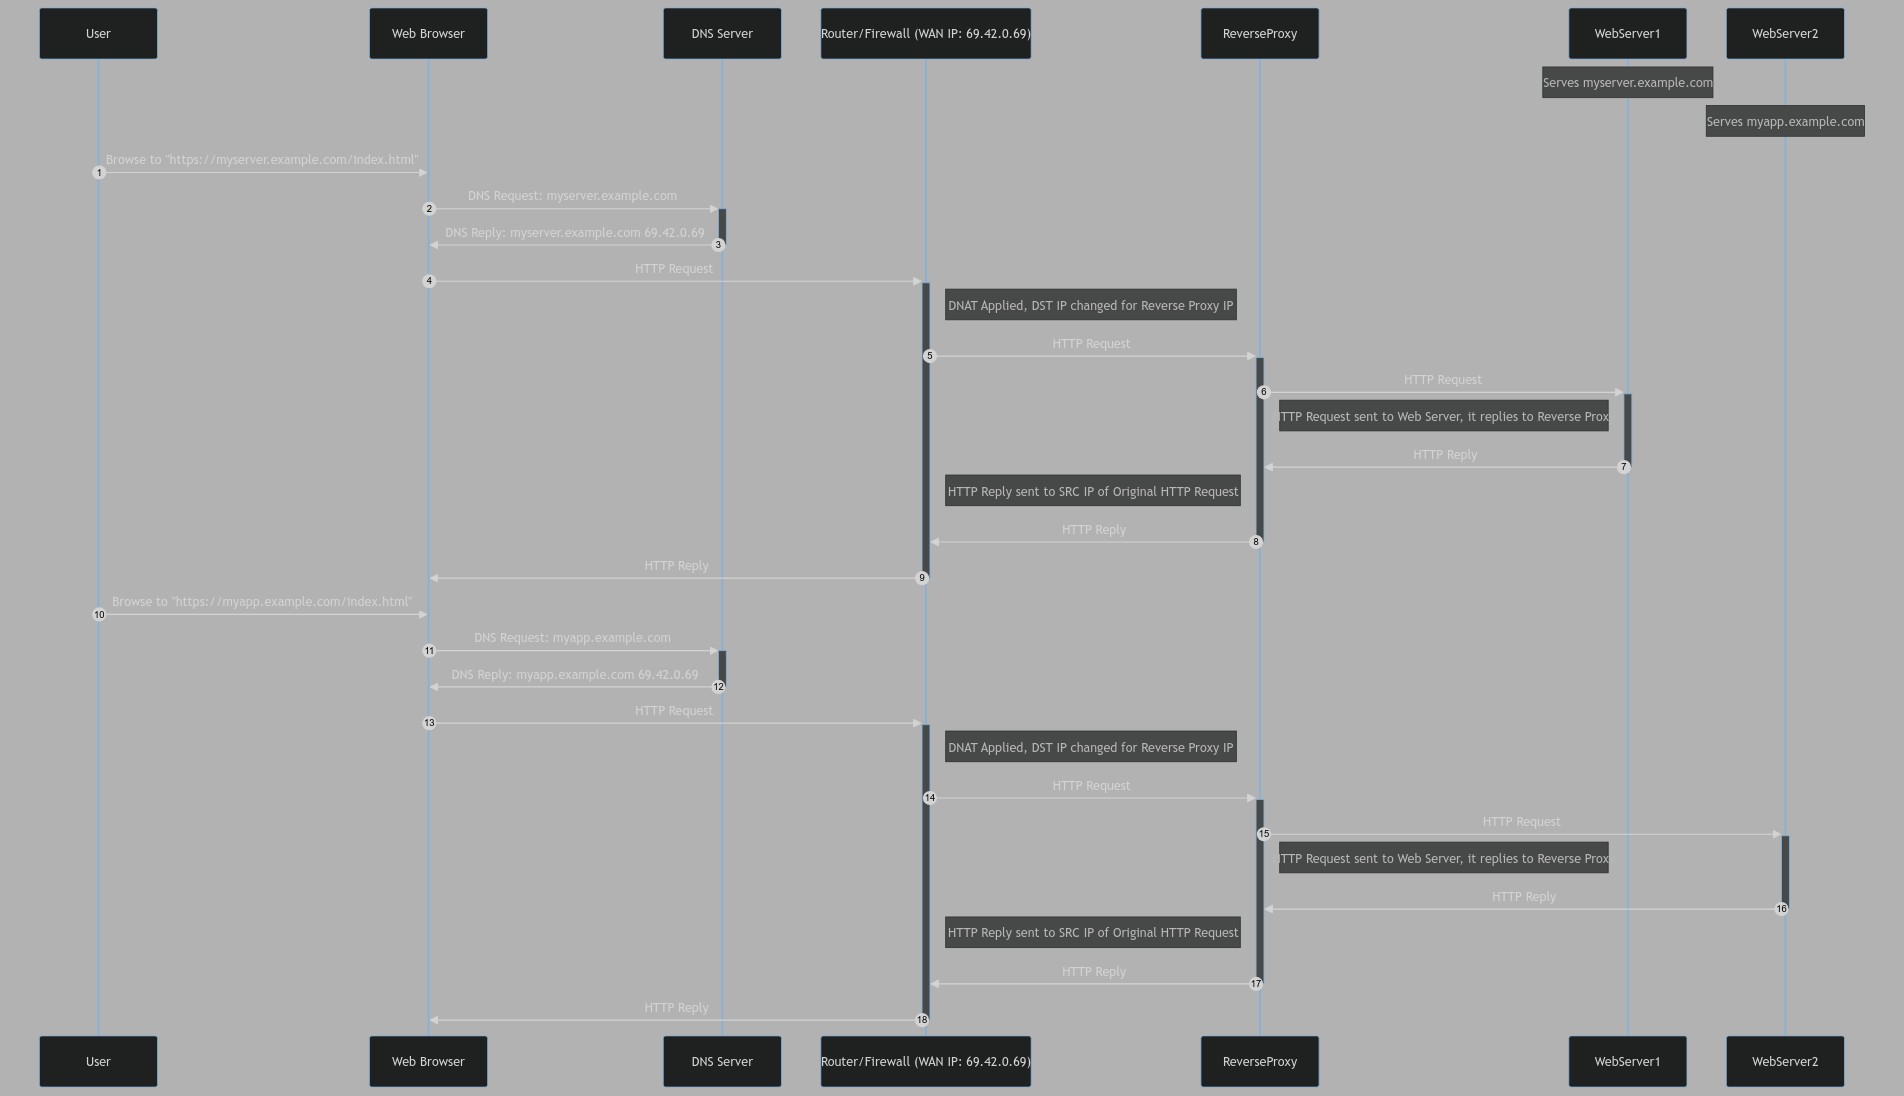
Let's add a second server
So we add a second webserver. This webserver will have the internal IP 192.168.0.70
You then add an A record in your DNS Server for the domain myapp.example.com. Since you the server is still behind your WAN IP, you set the record to 69.42.0.69. (See the DNS note at the end)
But now, you have a problem for the D-NAT (port forwarding). You already have forwarded the port 80 to your first webserver. So you decide to use an adjacent port, the port 81. So when you have traffic reaching your WAN IP on port 81, your router will translate the DST IP for your second webserver, and translate the DST Port for 80.
So a request for this second webserver will have a URI that looks like this : http://myapp.example.com:81/index.html
NAT Example
IP Packet {
	SRC: 145.254.160.237
	DST: 69.42.0.69
	Payload: TCP Packet {
		SRC Port: 36746
		DST Port: 81
		Payload: {...}
	}
}
becomes
IP Packet {
	SRC: 145.254.160.237
	DST: 192.168.0.70
	Payload: TCP Packet {
		SRC Port: 36746
		DST Port: 80
		Payload: {...}
	}
}
Reverse Proxy Time!
So our setup works, but it is ugly to use. Who wants to specify a port in the URI?
Time to setup a reverse proxy.
A reverse proxy can be explained as being the single open door for all your webserver. One IP/Port combinaison for all your webservers.
So you add another server, your reverse proxy. You give it the IP 192.168.0.42. You edit your port forwarding so that incoming packets for your WAN IP at port 80 is forwarded to your reverse proxy on port 80.
NAT Example
IP Packet {
	SRC: 145.254.160.237
	DST: 69.42.0.69
	Payload: TCP Packet {
		SRC Port: 36746
		DST Port: 80
		Payload: {...}
	}
}
becomes
IP Packet {
	SRC: 145.254.160.237
	DST: 192.168.0.42
	Payload: TCP Packet {
		SRC Port: 36746
		DST Port: 80
		Payload: {...}
	}
}
Now, your reverse proxy receives all the HTTP traffic going to your WAN IP. But how does it knows which webserver is the correct one for the request? Well, it doesn't have the URI that was requested. But it definetely can see the Host header of the HTTP packet. So it uses that to forward the request to the correct server.
The reverse proxy also does some transformation to the request packet so the webserver sends the reply back to the proxy, and the proxy then do some additionnal transformation before sending the reply to the client/requester.
Full request example
For the URI http://myserver.example.com/index.html
Initial Packet (as sent by client)
IP Packet {
	SRC: 145.254.160.237
	DST: 69.42.0.69
	Payload: TCP Packet {
		SRC Port: 36746
		DST Port: 80
		Payload: HTTP Packet {
			GET /index.html HTTP1.1
			Host: myserver.example.com
		}
	}
}
Is first D-NATed to the correct internal server, the reverse proxy
IP Packet {
	SRC: 145.254.160.237
	DST: 192.168.0.42
	Payload: TCP Packet {
		SRC Port: 36746
		DST Port: 80
		Payload: HTTP Packet {
			GET /index.html HTTP1.1
			Host: myserver.example.com
		}
	}
}
The reverse proxy receives this request, and sends the request to the webserver. Technically, the reverse proxy becomes client of the webserver. That's what a proxy does: it takes care of the whole request, it doesn't just change some fields in the packet, like D-NAT does.
Note that the SRC and DST IP address have been changed. And since the reverse proxy initiated the request, the SRC port is different.
IP Packet {
	SRC: 192.168.0.42
	DST: 192.168.0.69
	Payload: TCP Packet {
		SRC Port: 56378
		DST Port: 80
		Payload: HTTP Packet {
			GET /index.html HTTP1.1
			Host: myserver.example.com
		}
	}
}
Then the webserver replies to the reverseproxy, and the reverse proxy then sends that reply to the original client.
Sequence Diagram
Bonus
DNS Suggestion
You should have a record in your domain zone that resolves to your WAN IP. There are security concerns when actually doing this. You should research the risks.
For example, you could have the domain reverseproxy.example.com resolving to 69.42.0.69 with an A record. Then you simply add CNAMEs (CNAME Record, DNS Aliases) for each of your websites : webserver.example.com resolves to reverseproxy.example.com which resolves to 69.42.0.69. If your WAN IP changes and you need to update your DNS Server, you only have one record (the A record) to update.
You can replace reverseproxy.example.com by the domain you have configured with your Dynamic DNS Provider, or have it be a CNAME that resolves to your DynDNS.
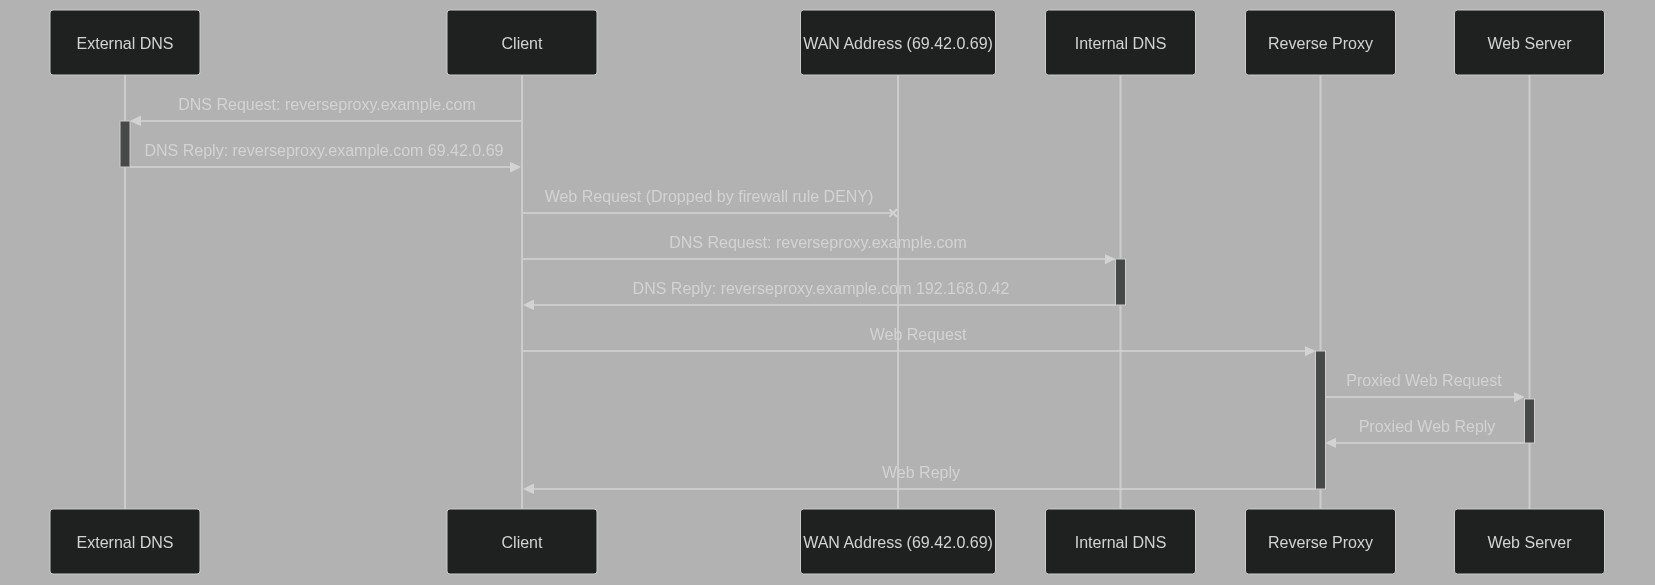
About Split-Horizon DNS
Imagine that you are outside your network. You try to reach your webserver, so you go to http://myserver.example.com/index.html. From there, you device will resolve the hostname myserver.example.com to 69.42.0.69, your WAN IP. All is good and working here. The HTTP request gets sent to your WAN IP, your router/firewall translates the destination address to the IP of the reverse proxy, and the request gets a reply.
Now, let's say you are inside your network, where the reverse proxy lives. You try the same request for http://myserver.example.com/index.html. This time, you don't get a reply. Why is that?
Put simply, it's because the D-NAT is only applied on the WAN Interface which is assigned the WAN IP.
Since you are inside your network, and the resolved destination is outside (remember, the domain was resolved to 69.42.0.69, your WAN IP, which is NOT on your LAN), the request gets send to your router/firewall
Since the D-NAT is setup on the WAN Interface (remember the layer 1-2?), it doesn't work from inside your network, since the traffic reaches the LAN Interface, and no D-NAT is applied there. So the firewall drops the requests, and your browser never receives a reply. Or in some case you might get a connection reset.
I think that's why they call it port-forwading on most consumer router/firewall, since it is only applied on the WAN Interface. If you could setup a D-NAT on your LAN Interface, then you could simply replace your WAN IP for your Reverse Proxy IP.
Some router/firewall are smart enough to have the D-NAT also applied on the LAN Interface. So if it receives a packet destined for the WAN IP on the LAN Interface, it will D-NAT it to the correct server. That's called hairpin NAT.
Split-Horizon DNS
Split-Horizon DNS consists in having different DNS answer depending on which network you are on.
So on your home network, you need a DNS Server that your devices can query for your domain.
So using my DNS suggestion, you want to resolve reverseproxy.example.com internally to your reverse proxy IP address, and externally to your WAN IP.
But DNS can be complicated, and split-horizon introduces more complexity and possible problems. Best is to test if hairpin NAT is doable on your router/firewall.
Sequence Diagram
sequenceDiagram

    participant ED as External DNS
    participant C as Client

    participant WA as WAN Address (69.42.0.69)
    participant ID as Internal DNS
    participant RP as Reverse Proxy
    participant W as Web Server

    C ->>+ ED: DNS Request: reverseproxy.example.com
    ED ->>- C: DNS Reply: reverseproxy.example.com 69.42.0.69
    C -x WA: Web Request (Dropped by firewall rule DENY)

    C ->>+ ID: DNS Request: reverseproxy.example.com
    ID ->>- C: DNS Reply: reverseproxy.example.com 192.168.0.42
    C ->>+ RP: Web Request
    RP ->>+ W: Proxied Web Request
    W ->>- RP: Proxied Web Reply
    RP ->>- C: Web Reply
About Load-Balancers
I want to talk about load-balances because a reverse proxy can be a load balancer.
It's a little bit more complicated, but our reverse proxy is also a load balancer. But for each website, you only have one server behind. A load-balancer allows you to have multiple (web)server behind, all sharing the load. Of course the application/website needs to support it.


Discussion