FileFlows - Self-Hosted Media Conversion Guide
Save Massive Amounts of Disk Space using the Self-Hosted FileFlows to Convert your Media


You probably know how fast media files can take up space on your computer. If left unchecked, they can quickly fill up your drives and leave you running out of room. FileFlows helps by compressing those files without sacrificing too much quality, freeing up some space for you.
What is FileFlows?
With FileFlows, you can manage all sorts of files. Videos, music, pictures, documents, even comics and e-books. It's designed to handle whatever type of file you need to process or monitor.
I am using Pop-OS as a server to host my media. This is a glorified version of Ubuntu with NVIDIA drivers baked in. Let's get started installing FileFlows!
Installing the NVIDIA Container Toolkit
First you should make sure you have the NVIDIA Container Toolkit installed on your system. This allows Docker to use your GPU.
# Add the package repositories
$ distribution=$(. /etc/os-release;echo $ID$VERSION_ID)
$ curl -s -L https://nvidia.github.io/nvidia-docker/gpgkey | sudo apt-key add -
$ curl -s -L https://nvidia.github.io/nvidia-docker/$distribution/nvidia-docker.list | sudo tee /etc/apt/sources.list.d/nvidia-docker.list

$ sudo apt-get update && sudo apt-get install -y nvidia-container-toolkit
$ sudo systemctl restart docker
Install FileFlows using Docker Compose
I installed FileFlows on my server using Docker Compose. If you need help installing Docker and want to learn more about how self-hosting with Docker works, please see our getting started with self-hosting guides.
This is a Docker Compose with NVIDIA support.
services:
  fileflows:
    image: revenz/fileflows
    restart: unless-stopped
    ports:
      - "19200:5000"
    environment:
      - TZ=America/Denver
      - PUID=1000
      - PGID=1000
      - NVIDIA_DRIVER_CAPABILITIES=compute,video,utility
      - NVIDIA_VISIBLE_DEVICES=all
    volumes:
      - /mnt/media/TV:/TV-Shows
      - /mnt/media/Movies:/Movies
      - /mnt/media/Youtube:/Youtube
      - /docker/fileflows:/app/Data
      - /mnt/downloads:/temp
    deploy:
      resources:
        reservations:
          devices:
            - driver: nvidia
              count: 1
              capabilities: [gpu]
Change the port, environments and volumes as you need.
Getting started with FileFlows
The first thing you run into when launching FileFlows is adding plugins. These are the tools needed to do that tasks you want to do. You will want the following plugins enabled.
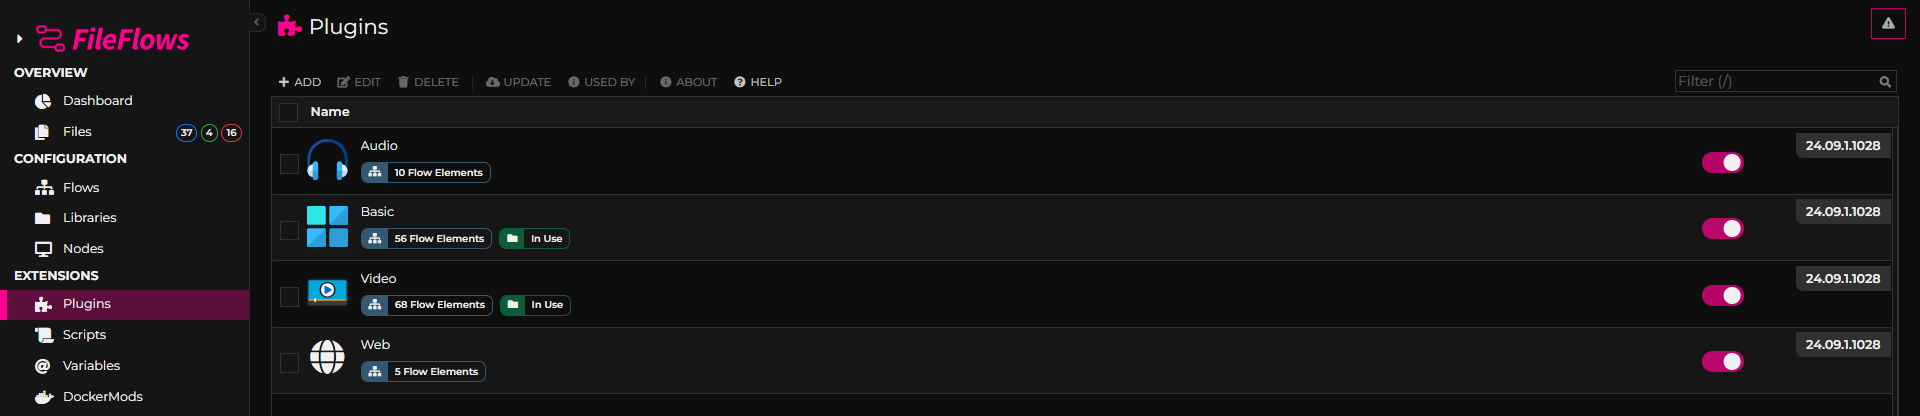
- Audio
- Video
- Basic
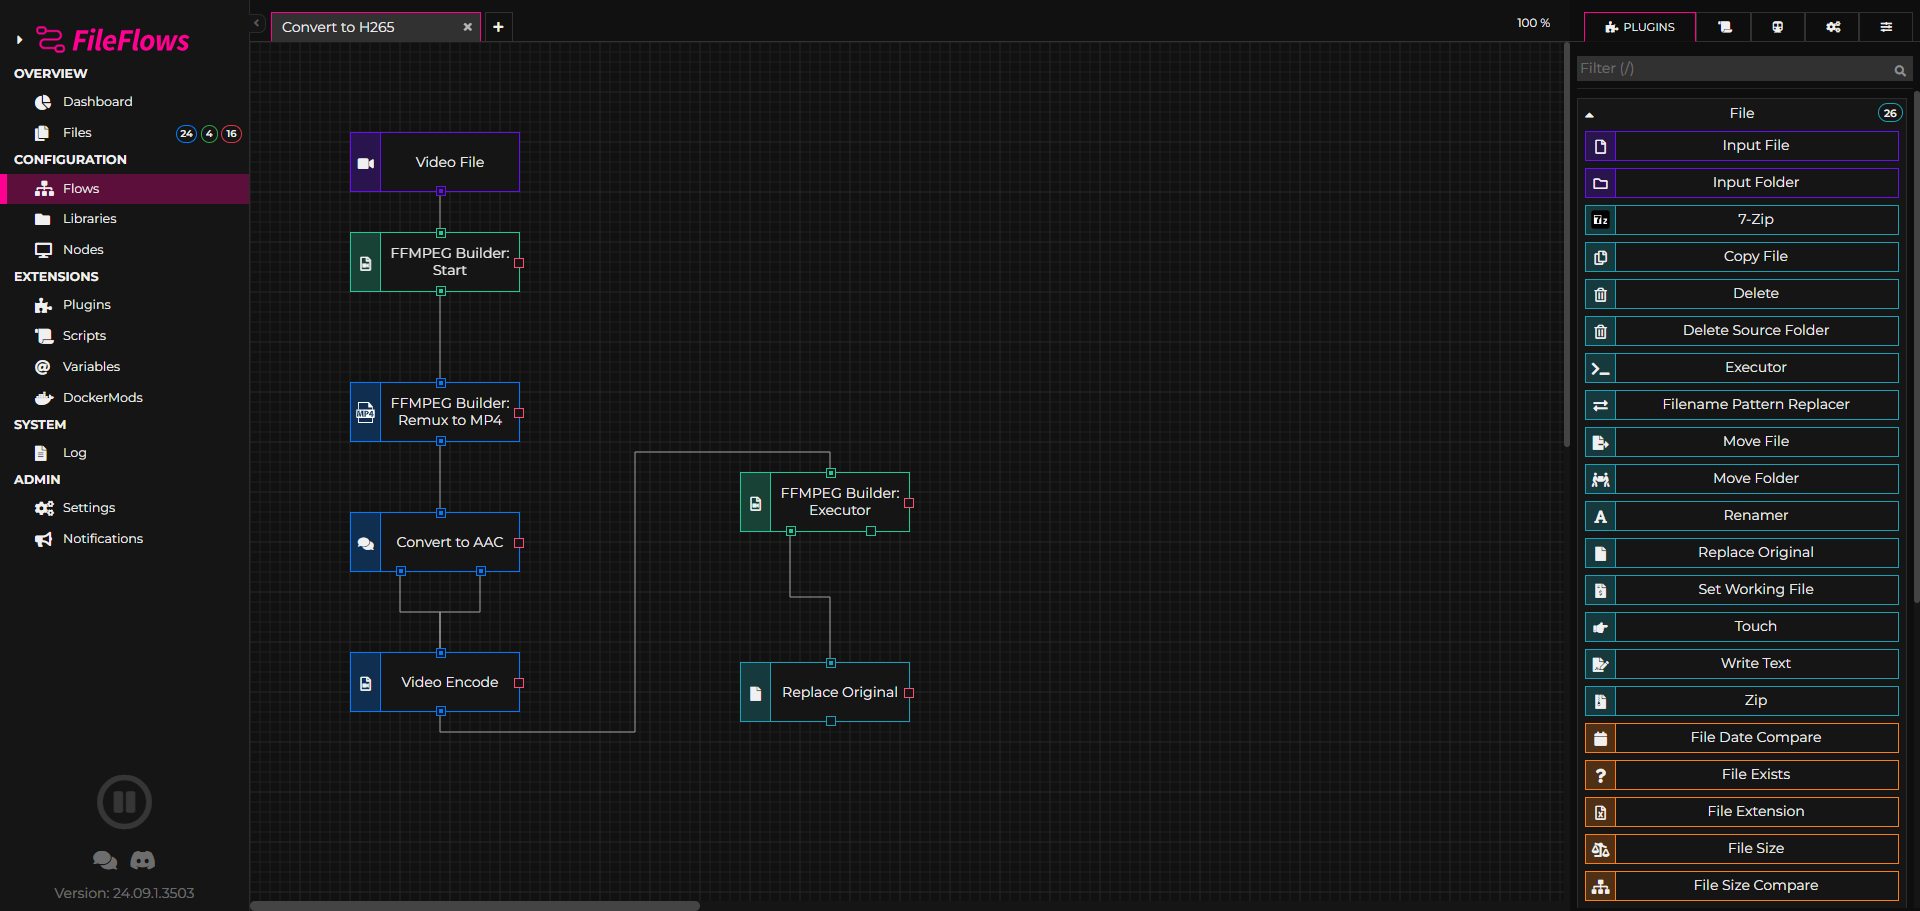
Adding a Flow in FileFlows
FileFlows provides a powerful flow system that allows users to create custom processing flows using JavaScript or community-developed scripts. This flexibility enables you to tailor your workflow to specific needs and applications.
Here is a look at the Flow I am using:
{
  "Name": "Convert to H265",
  "Type": 0,
  "Revision": 16,
  "Properties": {
    "Fields": [],
    "Variables": {}
  },
  "Parts": [
    {
      "Uid": "38e76a25-9abf-4adb-988b-f016b6161e95",
      "Name": "",
      "ReadOnly": false,
      "FlowElementUid": "FileFlows.VideoNodes.VideoFile",
      "xPos": 100,
      "yPos": 90,
      "Icon": "fas fa-video",
      "Label": "",
      "Inputs": 0,
      "Outputs": 1,
      "OutputConnections": [
        {
          "Input": 1,
          "Output": 1,
          "InputNode": "1fcc8f85-ce98-477b-a437-57af4e5ee22e"
        }
      ],
      "Type": 0,
      "Model": {
        "ProbeSize": 5
      }
    },
    {
      "Uid": "1fcc8f85-ce98-477b-a437-57af4e5ee22e",
      "Name": "FFMPEG Builder: Start",
      "ReadOnly": false,
      "FlowElementUid": "FileFlows.VideoNodes.FfmpegBuilderNodes.FfmpegBuilderStart",
      "xPos": 100,
      "yPos": 190,
      "Icon": "far fa-file-video",
      "Label": "",
      "Inputs": 1,
      "Outputs": 1,
      "OutputConnections": [
        {
          "Input": 1,
          "Output": 1,
          "InputNode": "e067c437-b482-4e08-86ef-e71587de1228"
        }
      ],
      "Type": 4,
      "Model": {}
    },
    {
      "Uid": "e067c437-b482-4e08-86ef-e71587de1228",
      "Name": "FFMPEG Builder: Remux to MP4",
      "ReadOnly": false,
      "FlowElementUid": "FileFlows.VideoNodes.FfmpegBuilderNodes.FfmpegBuilderRemuxToMP4",
      "xPos": 100,
      "yPos": 340,
      "Icon": "svg:mp4",
      "Label": "",
      "Inputs": 1,
      "Outputs": 1,
      "OutputConnections": [
        {
          "Input": 1,
          "Output": 1,
          "InputNode": "d8586031-c297-4d8f-bd1e-b5a578caf4a5"
        }
      ],
      "Type": 6,
      "Model": {}
    },
    {
      "Uid": "63363efc-e398-48fb-87cc-7db852e26ac1",
      "Name": "Video Encode",
      "ReadOnly": false,
      "FlowElementUid": "FileFlows.VideoNodes.FfmpegBuilderNodes.FfmpegBuilderVideoEncode",
      "xPos": 100,
      "yPos": 610,
      "Icon": "far fa-file-video",
      "Label": "",
      "Inputs": 1,
      "Outputs": 1,
      "OutputConnections": [
        {
          "Input": 1,
          "Output": 1,
          "InputNode": "b529060c-7cf6-4f84-a849-6cb0f55f1ad4"
        }
      ],
      "Type": 6,
      "Model": {
        "Codec": "h265",
        "HardwareEncoding": true,
        "Quality": 24,
        "Speed": "slow",
        "Encoder": "NVIDIA"
      }
    },
    {
      "Uid": "b529060c-7cf6-4f84-a849-6cb0f55f1ad4",
      "Name": "FFMPEG Builder: Executor",
      "ReadOnly": false,
      "FlowElementUid": "FileFlows.VideoNodes.FfmpegBuilderNodes.FfmpegBuilderExecutor",
      "xPos": 490,
      "yPos": 430,
      "Icon": "far fa-file-video",
      "Label": "",
      "Inputs": 1,
      "Outputs": 2,
      "OutputConnections": [
        {
          "Input": 1,
          "Output": 1,
          "InputNode": "f88d2dd2-f046-4f8b-8310-060433f8b7a9"
        }
      ],
      "Type": 5,
      "Model": {
        "HardwareDecoding": true
      }
    },
    {
      "Uid": "f88d2dd2-f046-4f8b-8310-060433f8b7a9",
      "Name": "",
      "ReadOnly": false,
      "FlowElementUid": "FileFlows.BasicNodes.File.ReplaceOriginal",
      "xPos": 490,
      "yPos": 620,
      "Icon": "fas fa-file",
      "Label": "",
      "Inputs": 1,
      "Outputs": 1,
      "OutputConnections": [],
      "Type": 2,
      "Model": {
        "MoveFolder": true,
        "DeleteOriginal": true,
        "DestinationPath": "D:\\videos\\converted"
      }
    },
    {
      "Uid": "d8586031-c297-4d8f-bd1e-b5a578caf4a5",
      "Name": "Convert to AAC",
      "ReadOnly": false,
      "FlowElementUid": "FileFlows.VideoNodes.FfmpegBuilderNodes.FfmpegBuilderAudioConverter",
      "xPos": 100,
      "yPos": 470,
      "Icon": "fas fa-comments",
      "Label": "",
      "Inputs": 1,
      "Outputs": 2,
      "OutputConnections": [
        {
          "Input": 1,
          "Output": 2,
          "InputNode": "63363efc-e398-48fb-87cc-7db852e26ac1"
        },
        {
          "Input": 1,
          "Output": 1,
          "InputNode": "63363efc-e398-48fb-87cc-7db852e26ac1"
        }
      ],
      "Type": 6,
      "Model": {
        "Codec": "aac",
        "Channels": 0,
        "Bitrate": 1,
        "Pattern": null,
        "NotMatching": false,
        "UseLanguageCode": false
      }
    }
  ]
}I know it looks overwhelming but you can actually build flows using the FileFlows web ui. Choose the settings you want and voila! Believe it or not, this is actually a VERY basic flow compared to ones I have seen on the community repo. But, it does exactly what I need it to do.
If you're looking for an easy way to get started with FileFlows, you can use my pre-made Flow by importing the file directly. Just keep in mind that this particular Flow uses NVIDIA encoding, so you'll need a GPU from that manufacturer to take full advantage of it. Even if you don't have an NVIDIA GPU, you can still use my pre-made Flow. It'll just do the encoding work on your computer's CPU instead of utilizing your graphics card for faster processing.
Double clicking on the "Video Encode" box will allow you to view and change the settings for that task.
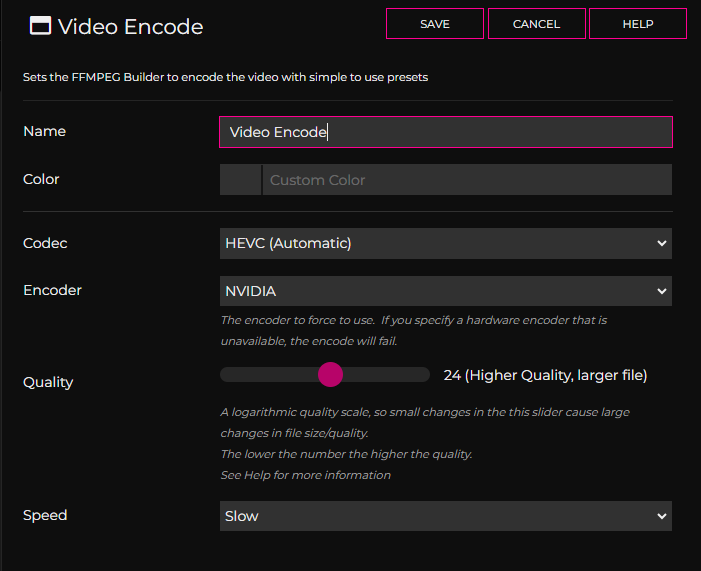
I've thoroughly tested various settings and landed on what works best for me. Smaller files with minimal quality loss, which is perfect for my needs. My NVIDIA 2080ti can convert a 3GB file in just 15 minutes when using four concurrent runners. This setup is great for beginners who want to shrink oversized MKV files down to MP4 format, and it's still something I use today. I've saved around 4TB of space with this Flow! I'll talk more about runners soon.
Adding a Library to FileFlows
Libraries are created for the media you want to convert. Each library can have different Flows or settings. It really gives you more granular control of your media. Make sure you mounted the volumes in Docker Compose where your media lives. Browse to "Libraries" and add one.
Here is where you also choose the Flow to use on the Library. So make sure you created a Flow first. You can't skip that step!
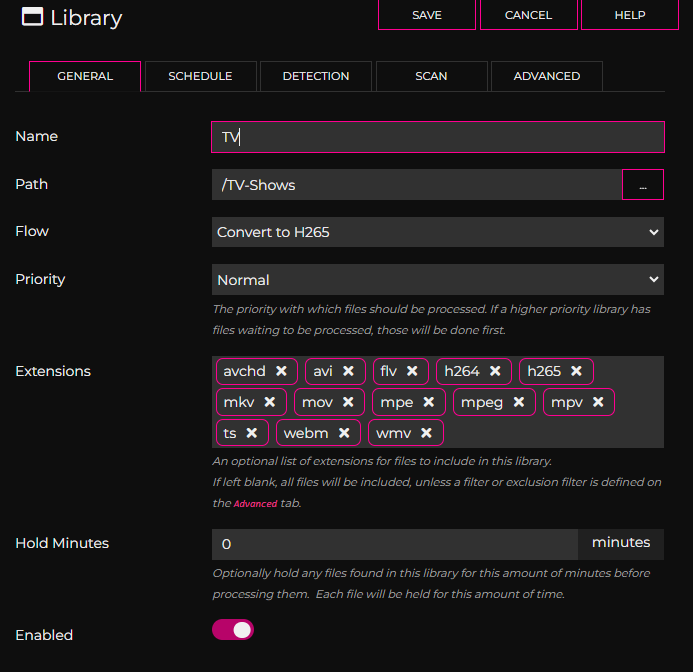
Like I said earlier, the Library settings are what really give you control over how FileFlows runs. You can choose when to run conversions using the Schedule tab, scan the folders automatically to "watch" for media to be converted and more. I have mine set to scan every 60 seconds which I believe is the default when enabled.
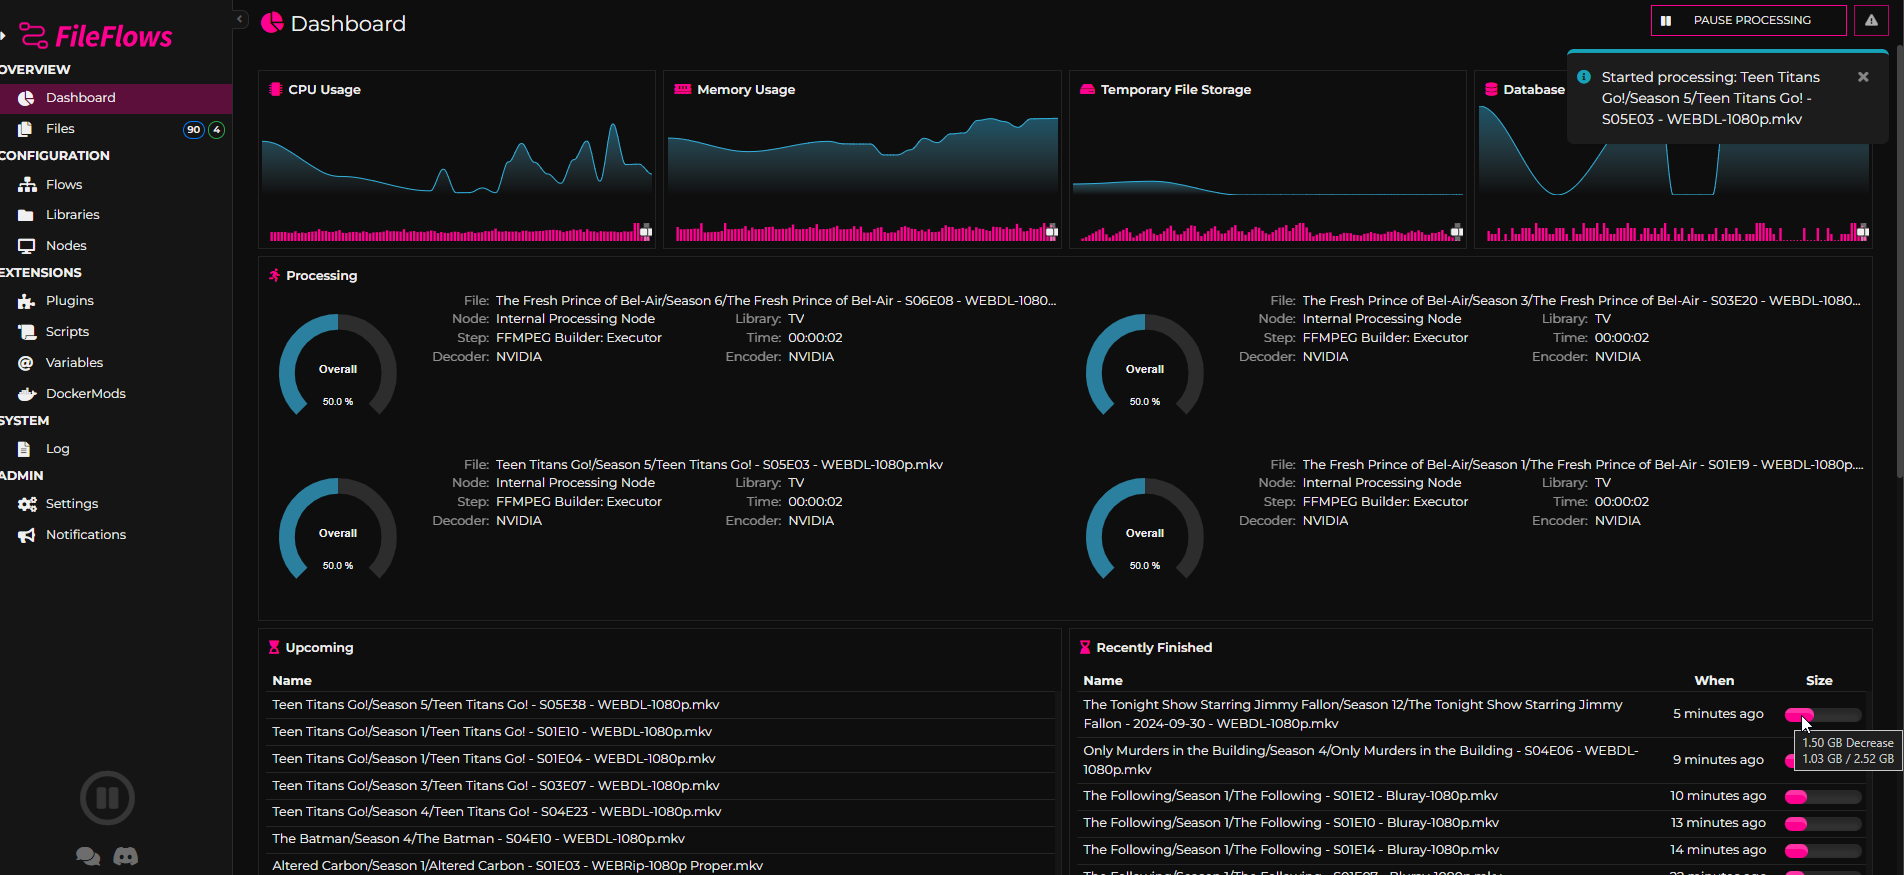
Converting Media using FileFlows
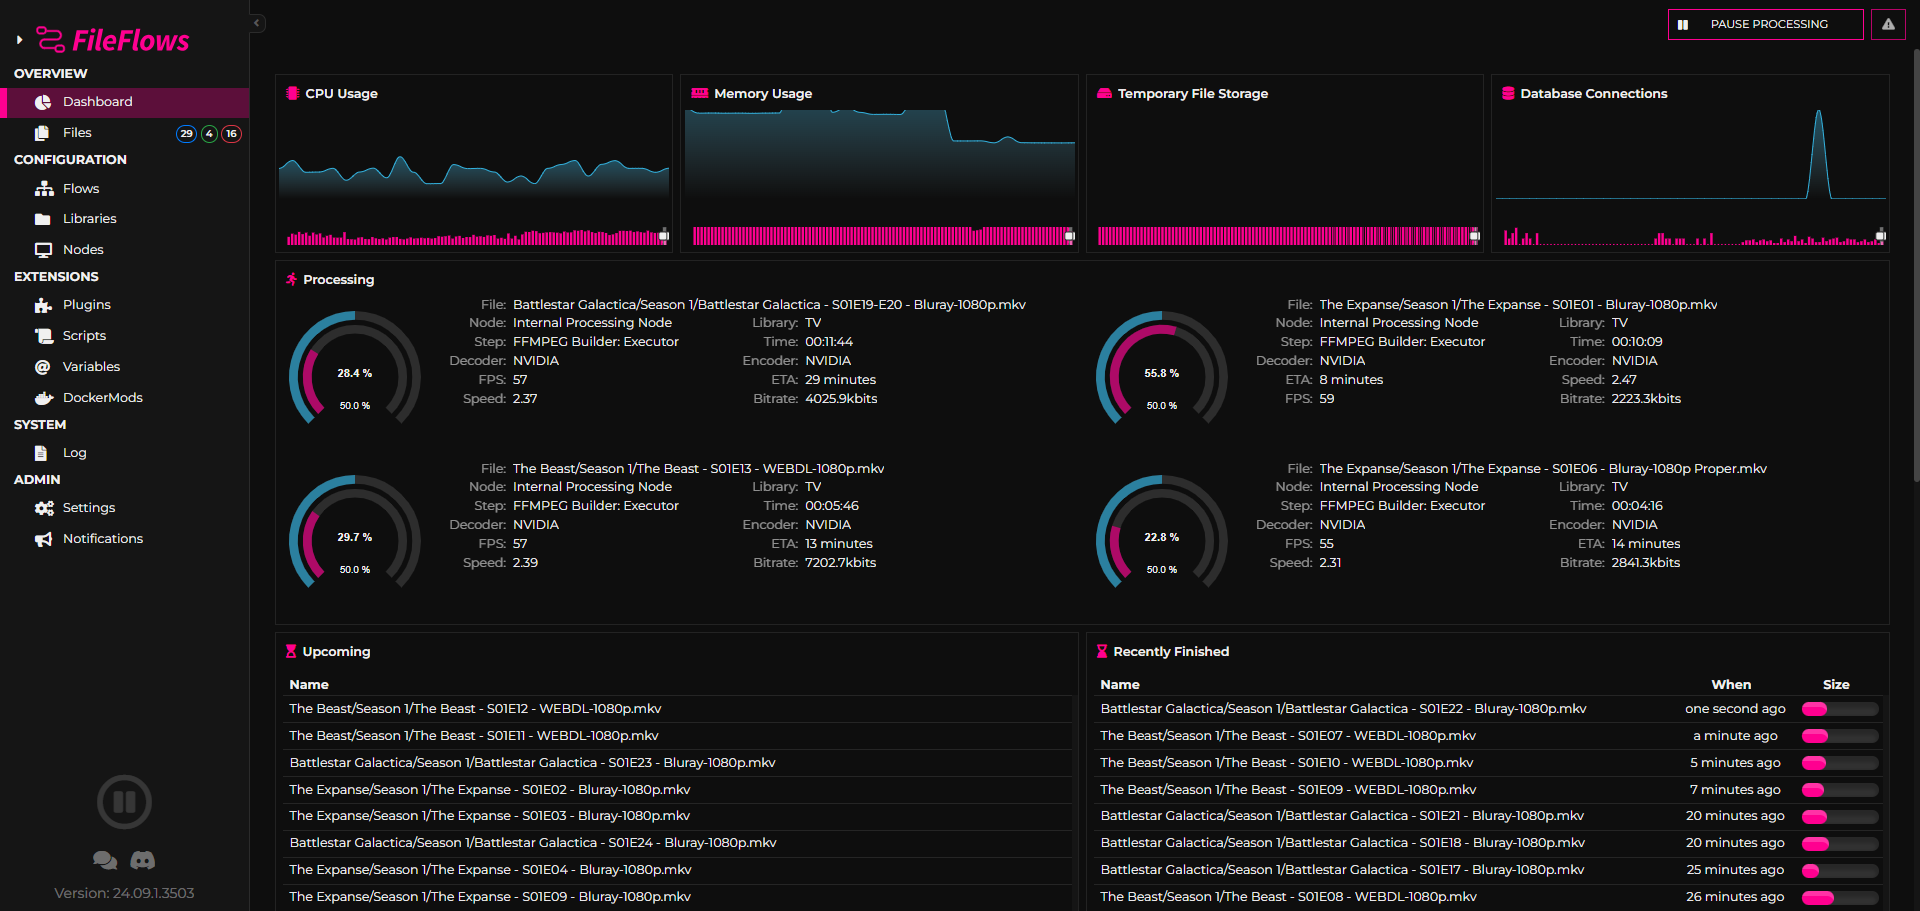
I'll be using FileFlows to convert MKV video files to MP4. Most of the MKV files are 3-4gb in size and are using the H.264 codec. FileFlows will transcode and convert the video files to my desired codec (HVEC or H.265) .
If you followed the steps correctly, you should see both Decoder and Encoder using your NVIDIA GPU.
GPU/Hardware Encoding with FileFlows
NVIDIA, AMD, and Intel GPUs can be utilized to process files at incredible speeds, making it ideal for heavy data processing tasks.
Every GPU is different so I recommend starting with 2 runners on lower end GPUs. This can be changed on the "Nodes" page by clicking on your node.
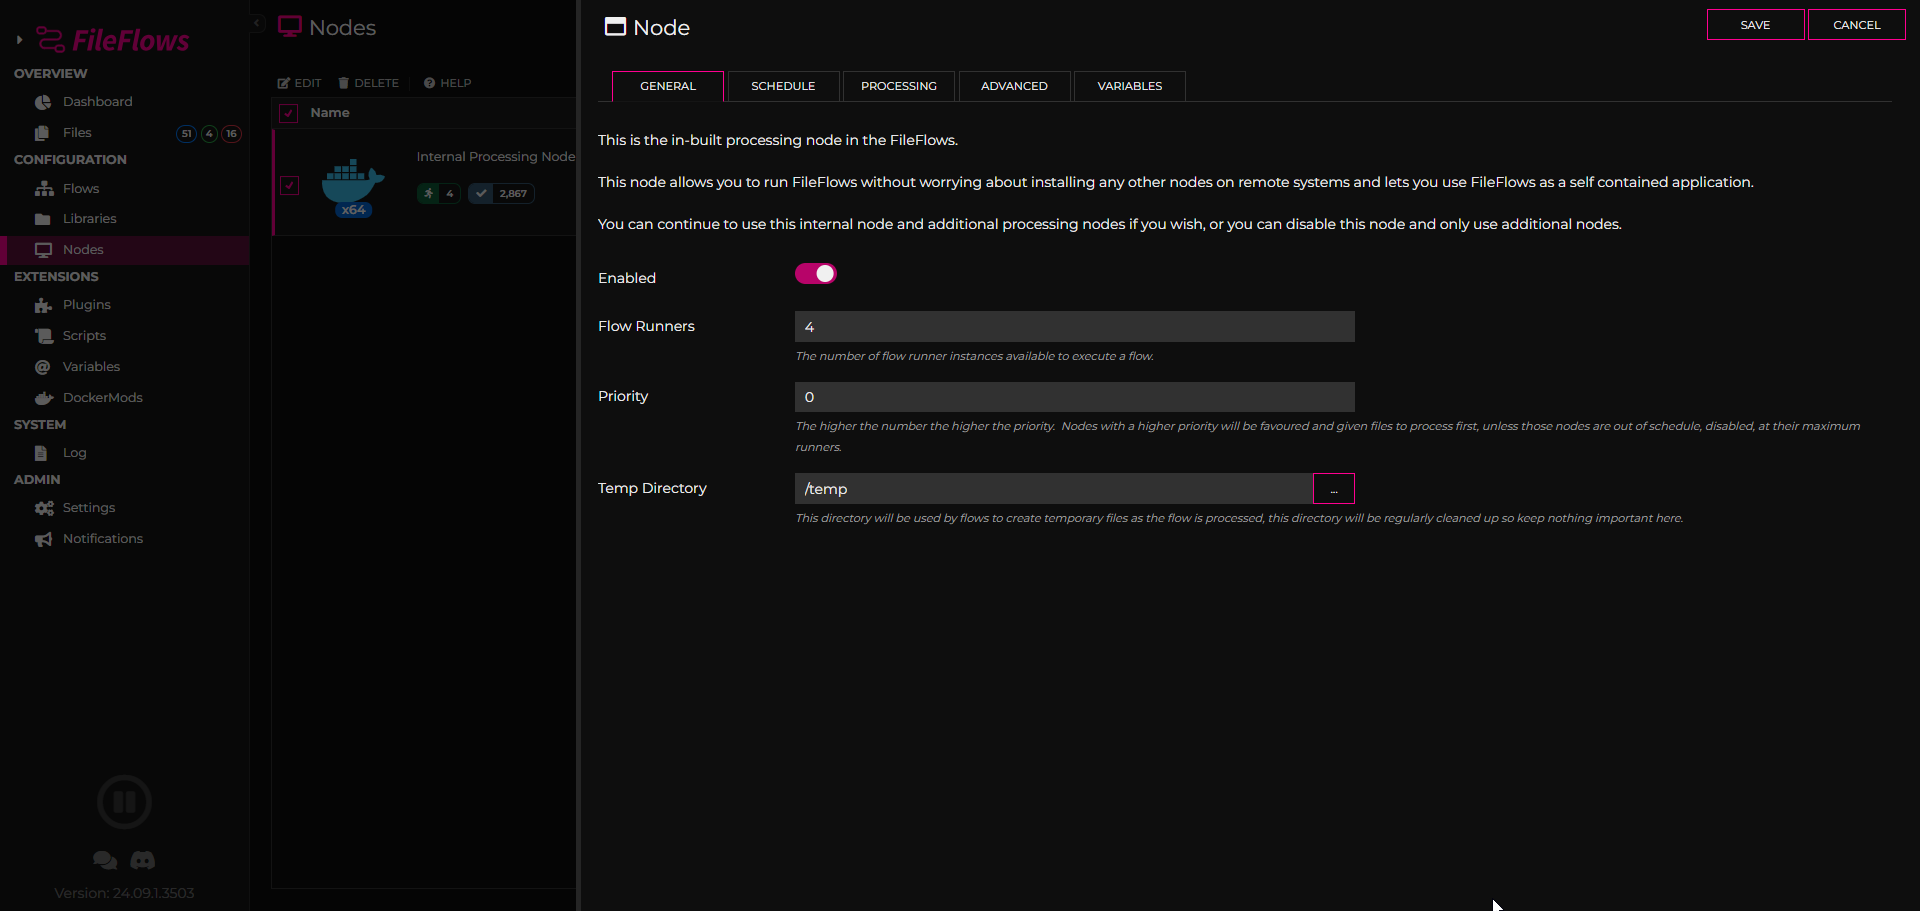
I've got a NVIDIA 2080ti, which handles multiple runners smoothly. Four at once is no problem, and six works just fine too. Since I'm also running some AI tools on the same machine, I've had to reserve some VRAM for those apps. This stuff can be tricky to understand, though. Just because a newer GPU like the 4060ti has more VRAM doesn't necessarily mean it's more powerful - in fact, my older 2080ti is actually faster due to its higher memory bandwidth. Newer model does not always mean faster or better!
Reporting and Analytics
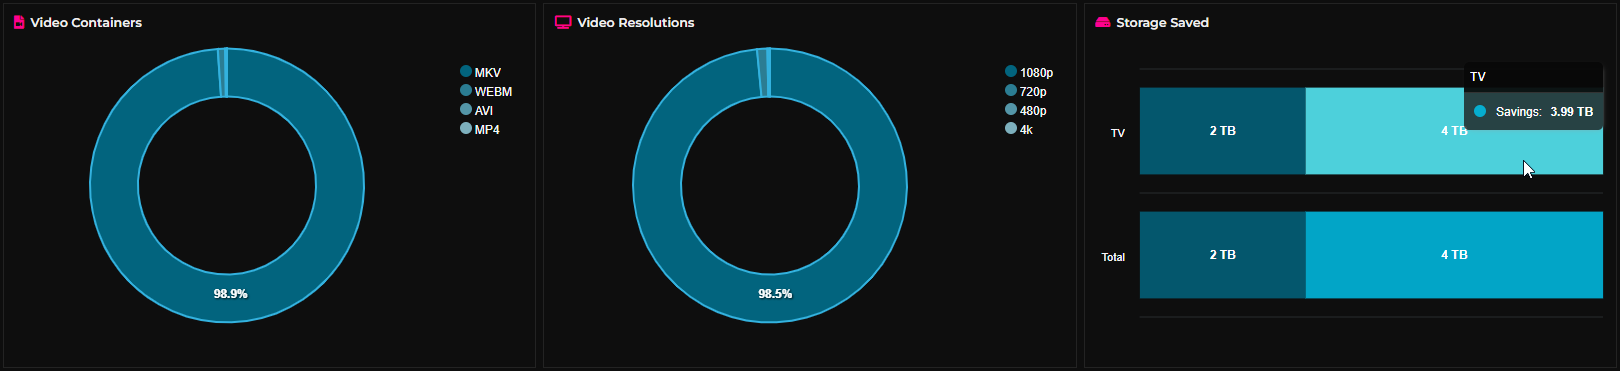
Once files are processed, FileFlows offers detailed reporting on file codecs used, processing times, container types, and storage savings. You can also schedule advanced workflows for peak usage periods, ensuring optimal resource utilization and minimizing downtime.
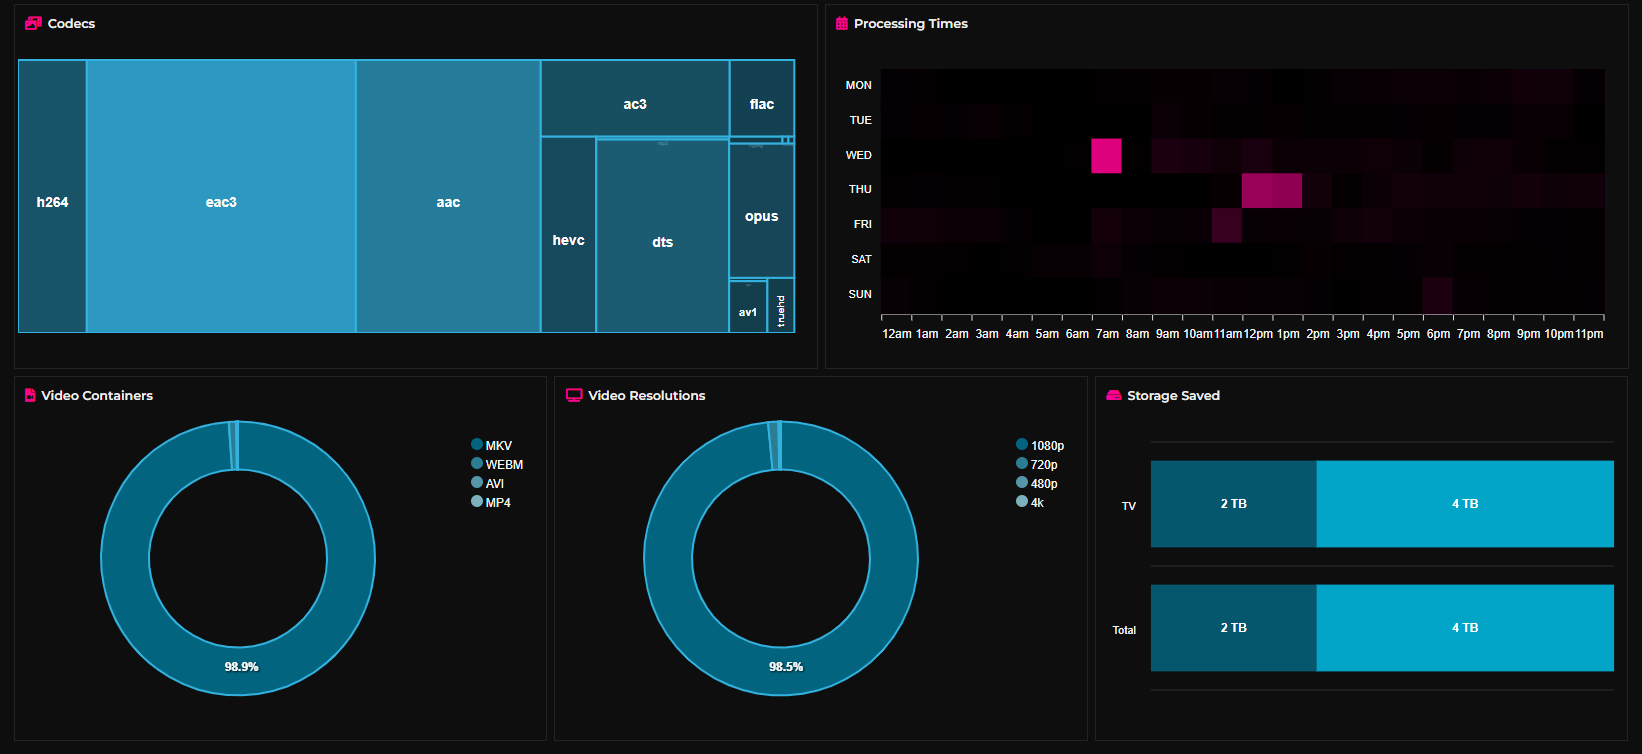
You can see here how effective this Flow has been. Most of the files converted are MKV, and I've managed to save around 4TB of space. To avoid any conflicts with other tasks that run at specific times, I've scheduled FileFlows to disable conversions from 5am-7am each day. This allows my system to focus on tasks like running SnapRAID sync, which likes to have a quiet environment when it's doing its thing.
Final Notes and Thoughts
I've been using FileFlows for about a year now, and it's been saving me terabytes of space and automating a tedious process. When I had some initial issues setting it up, the developer was super helpful in getting me sorted out. If you're new to FileFlows, I'd recommend joining their Discord server where you can see examples from other users and ask questions if you need help along the way.
Overall, I'm extremely satisfied with FileFlows and would definitely recommend it to anyone looking to optimize their file management workflow. It's a reliable, efficient tool that has saved me a huge amount of time and storage space. With the support of a helpful community, there's no reason not to give it a try!
Listen to the Podcast Version