

If you read the original post about MergerFS and SnapRAID, I am sure you've been wondering how to set it up. So, let's dig in and get you a data pool created that we will protect against a drive failing with SnapRaid. Then configure SnapRaid to "magically" back your drives up in the background so you can worry or even tinker with some of the other cool apps that have been reviewed on Noted.
This is a 2 part series.


Installation
Surprisingly, both MergerFS and SnapRaid are in the Ubuntu and Debian repositories, making the installation the easiest part of this whole thing.
When installing anything new on Ubuntu or Debian, run the following commands.
sudo apt update
sudo apt upgrade -y
Once everything is happy there, we will be good to install MergerFS. This is a simple command to install it, and then we will configure it.
sudo apt install mergerfs -yThis doesn't take very long to run, and we are done. Not really. Now, we need to configure it.
Configuring
Alright, so let's get to configuring and setting up a pool; I have a couple of different-sized drives we will use. This server has four 4TB drives and four 8TB drives. We will ignore two of the 8TB drives for now.
NAME   MAJ:MIN RM   SIZE RO TYPE MOUNTPOINTS
sda      8:0    0   7.3T  0 disk
sdb      8:16   0   7.3T  0 disk
sdc      8:32   0   7.3T  0 disk
sdd      8:48   0   7.3T  0 disk
sde      8:64   0   3.6T  0 disk
sdf      8:80   0   3.6T  0 disk
sdg      8:96   0   3.6T  0 disk
sdh      8:112  0 232.9G  0 disk
├─sdh1   8:113  0 231.9G  0 part /
├─sdh2   8:114  0     1K  0 part
└─sdh5   8:117  0   976M  0 part [SWAP]
sdi      8:128  0 465.8G  0 disk
sdj      8:144  0   3.6T  0 disk
We first need to create directories to mount these drives and the storage folder to use for the pool. I like to use the /mnt location and create the directors as disk1, disk2, etc.
sudo mkdir /mnt/disk{1..6}
sudo mkdir /mnt/storage
sudo chown (username):(username) /mnt/disk*
sudo chown (username):(username) /mnt/storage
This will create six directories and then give the user access to them. Be sure to change (username) to your user.
As we can see from all my drives, they are empty with no partition tables. I like to use ext4 for my data, but you are welcome to use whatever file system you like. I will share how I do this below. If you have drives that already have data on them, you only need to modify your fstab file like below.
sudo gdisk /dev/sd*
Command: n ↵
Partition Number: 1 ↵
First sector: ↵
Last sector: ↵
Hex Code: ↵
w
y
Creating Partition Table
sudo mkfs -t ext4 /dev/sd*1
Creating FS on Partition Table
You will want to do this for all the disks you plan to use for MergerFS. Before anyone complains that ext4 doesn't support bigger drives, it does. The problem we will have is that ext4 doesn't support large files. For this server, we could get away with configuring the drives we plan to use for SnapRAID the same way, but I will match my new build for this and use a different file system for those.
Now that all our disks have partitions and filesystems, we want to modify the fstab file to auto-mount this drive on boot and make the pool. This is where the magic happens.
sudo nano /etc/fstab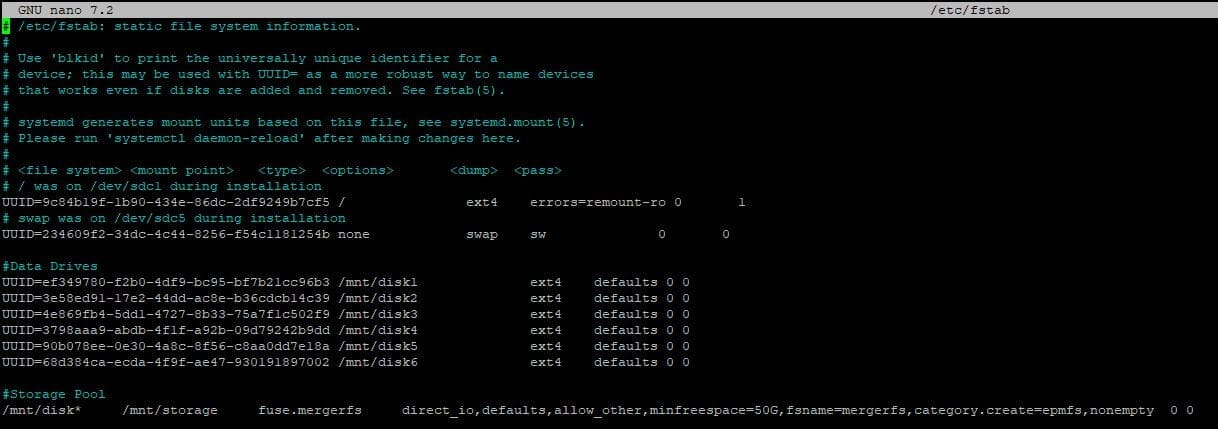
This is what mine looks like after adding my drives. Again, before anyone complains, I like to use the partition UUID; this has allowed me to copy this config from system to system and never have to mess with remapping my drives.
What's that last line, you ask? Well, that is the magic. We are telling the system to fuse all the drives together as one using MergerFS. Remember how I said I like to do disk1, etc? I can tell MergerFS that any drive with the "disk" in the front is yours to create the pool. After you have modified your fstab to match mine, don't forget to change the UUID to match your drive's; you can run the commands below.
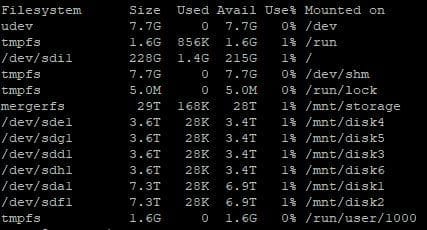
sudo mount -a
sudo df -h
Now you should be able to see the disks are mounted to the directories we created and that we now have a new mount showing mergers with the combined capacity of all our drives.
So, let's break down the last line before we move on. What we are telling the pool to do is the following.
- direct_io = giving the system direct access to write to this drive
- minfreespace = keep a minimum of at least 50g
- category.create=epmfs = existing path, most free space
Please take the time to go to the MergerFS GitHub to see what the different policies are and find what is right for you. I like the epmfs because it doesn't keep my media in one folder all on one drive. Allowing me to lose a drive without losing everything.
Conclusion
This guide turned out a bit lengthy, but I wanted to make sure I provided lots of info and clear instructions. To keep going with setting up SnapRAID, head over to Part 2. And if you want to chat with more folks or maybe even share your own insights, feel free to join our Discord community. Cheers!


Discussion