

Today we continue the project for setting up and installing MergerFS and SnapRAID.
This is a 2 part series


Okay, now that we have MergerFS up and running, giving us one spot to point applications at to store our media, let's move on to making sure that if something does happen to one of those drives, we can recover.
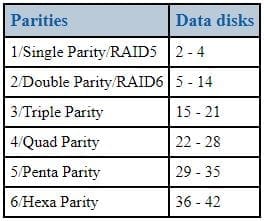
Before we get deep into configuring SnapRAID, let's take a second to look at why I am using two disks instead of one. SnapRAID recommends the following drive configuration.
"As a rule of thumb you can stay with one parity disk (RAID5) with up to four data disks, and then using one parity disk for each group of seven data disks, like in the table:"
We need to create two new mount points for these drives. I do the same thing as the data drives but call the mounts parity instead of disk.
Rember RAID is not a backup solution but does help protect your files to a degree.
Installation
If you rebooted between Part 1 and now or even just getting around to this part after some time away, it is good to go ahead and check that everything is up to date by running the following commands.
sudo apt update
sudo apt upgrade -y
Once everything is happy there, we will be good to install SnapRAID. This is a simple command to install it, and then we will configure it.
sudo apt install snapraid -yThis doesn't take very long to run, and we are done. Not really. Now, we need to configure it.
Configuring
If you remember, I have eight drives in this system, and we only used six so far. Well, it is time to put the other two drives to use.
sudo mkdir /mnt/parity{1,2}
sudo chown (username):(username) /mnt/parity*
Now that those are created, I recommend using new for this. I have even gone as far as buying bigger drives for parity and moving my old ones down to data to expand my capacity. It is also required that your parity drives be bigger or equal to the biggest data disk.
We have the mount points ready; let's get the drives ready. We will use the same commands as before to get a partition on them but will use a different file system.
The ext4 file system can not have a single file larger than 16TB. So, this is why I will use a file system that can support that for future-proofing and expandability.
sudo gdisk /dev/sd*
Command: n ↵
Partition Number: 1 ↵
First sector: ↵
Last sector: ↵
Hex Code: ↵
w
y
Now that the drives have a new partition let's get a file system on them. Again, this file system differs from the data drives because of the 16TB limitation. We first need to install XFS as it is not natively supported on Ubuntu or Debian.
sudo apt install xfsprogsNow that XFS is installed, we can create the filesystem on our parity drives.
sudo mkfs -t xfs /dev/sd*1Now that this is done for my drives, we need to edit the fstab file again so that they will mount on boot up. Below is what mine looks like now.
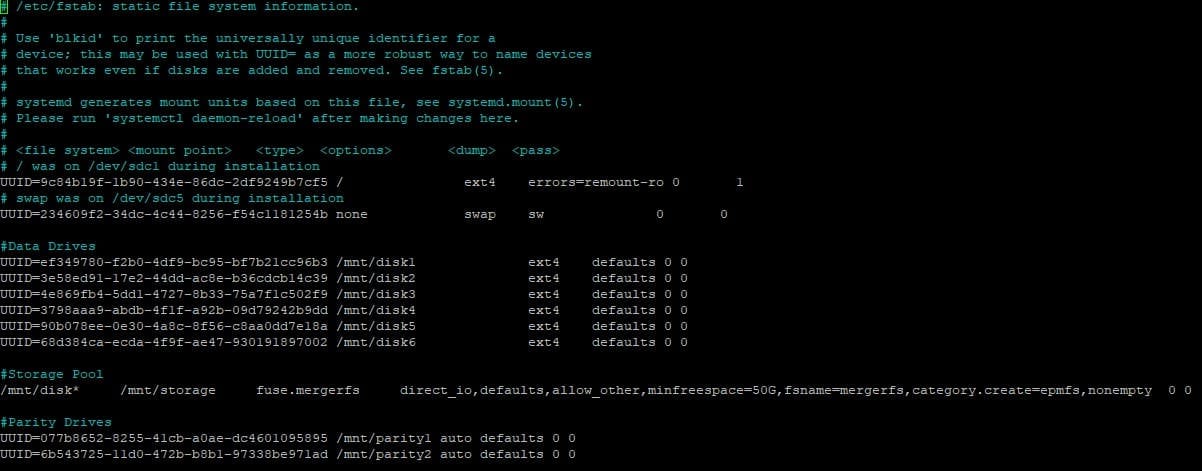
As you can see, we are doing nothing fancy with them with them in the fstab file. We can rerun the mount command or reboot; the choice is yours.
Well, the easy stuff is over. The next part isn't too hard either, but we want to be careful not to mess anything up. We will need to create a file /etc/snapraid.conf. I have posted my config from my server, but be sure to change it to match your configuration and drive counts.
# Example configuration for snapraid

# Defines the file to use as parity storage
# It must NOT be in a data disk
# Format: "parity FILE [,FILE] ..."
parity /mnt/parity1/snapraid.parity

# Defines the files to use as additional parity storage.
# If specified, they enable the multiple failures protection
# from two to six level of parity.
# To enable, uncomment one parity file for each level of extra
# protection required. Start from 2-parity, and follow in order.
# It must NOT be in a data disk
# Format: "X-parity FILE [,FILE] ..."
2-parity /mnt/parity2/snapraid.2-parity
#3-parity /mnt/diskr/snapraid.3-parity
#4-parity /mnt/disks/snapraid.4-parity
#5-parity /mnt/diskt/snapraid.5-parity
#6-parity /mnt/disku/snapraid.6-parity

# Defines the files to use as content list
# You can use multiple specification to store more copies
# You must have least one copy for each parity file plus one. Some more don't hurt
# They can be in the disks used for data, parity or boot,
# but each file must be in a different disk
# Format: "content FILE"
content /var/snapraid.content
content /mnt/disk1/snapraid.content
content /mnt/disk2/snapraid.content
content /mnt/disk3/snapraid.content
content /mnt/disk4/snapraid.content
content /mnt/disk5/snapraid.content
content /mnt/disk6/snapraid.content
content /mnt/parity1/snapraid.content
content /mnt/parity2/snapraid.content

# Defines the data disks to use
# The name and mount point association is relevant for parity, do not change it
# WARNING: Adding here your /home, /var or /tmp disks is NOT a good idea!
# SnapRAID is better suited for files that rarely changes!
# Format: "data DISK_NAME DISK_MOUNT_POINT"
data d1 /mnt/disk1/
data d2 /mnt/disk2/
data d3 /mnt/disk3/
data d4 /mnt/disk4/
data d5 /mnt/disk5/
data d6 /mnt/disk6/

# Excludes hidden files and directories (uncomment to enable).
#nohidden

# Defines files and directories to exclude
# Remember that all the paths are relative at the mount points
# Format: "exclude FILE"
# Format: "exclude DIR/"
# Format: "exclude /PATH/FILE"
# Format: "exclude /PATH/DIR/"
exclude *.unrecoverable
exclude /tmp/
exclude /lost+found/

# Defines the block size in kibi bytes (1024 bytes) (uncomment to enable).
# WARNING: Changing this value is for experts only!
# Default value is 256 -> 256 kibi bytes -> 262144 bytes
# Format: "blocksize SIZE_IN_KiB"
#blocksize 256

# Defines the hash size in bytes (uncomment to enable).
# WARNING: Changing this value is for experts only!
# Default value is 16 -> 128 bits
# Format: "hashsize SIZE_IN_BYTES"
#hashsize 16

# Automatically save the state when syncing after the specified amount
# of GB processed (uncomment to enable).
# This option is useful to avoid to restart from scratch long 'sync'
# commands interrupted by a machine crash.
# It also improves the recovering if a disk break during a 'sync'.
# Default value is 0, meaning disabled.
# Format: "autosave SIZE_IN_GB"
#autosave 500

# Defines the pooling directory where the virtual view of the disk
# array is created using the "pool" command (uncomment to enable).
# The files are not really copied here, but just linked using
# symbolic links.
# This directory must be outside the array.
# Format: "pool DIR"
#pool /pool

# Defines a custom smartctl command to obtain the SMART attributes
# for each disk. This may be required for RAID controllers and for
# some USB disk that cannot be autodetected.
# In the specified options, the "%s" string is replaced by the device name.
# Refers at the smartmontools documentation about the possible options:
# RAID -> https://www.smartmontools.org/wiki/Supported_RAID-Controllers
# USB -> https://www.smartmontools.org/wiki/Supported_USB-Devices
#smartctl d1 -d sat %s
#smartctl d2 -d usbjmicron %s
#smartctl parity -d areca,1/1 /dev/sg0
#smartctl 2-parity -d areca,2/1 /dev/sg0
After creating this file, we are done and only have one command left to run.
sudo snapraid syncIf this is a clean setup like mine, it doesn't take any time. This may take a while if you already have data on your drives. Grab some coffee or even join us on Discord.
SnapRAID Runner - Bonus
Okay, so we have everything set up, and we can schedule a simple cron job to run the syn job anytime we want. Let's say you accidentally delete an entire folder with numerous files you don't want to lose and don't catch it before the next sync. If we just run that command, it won't care, and those files are lost. That is where this script comes in.
Let's download the script from GitHub and get it configured. We need two files: snapraid-runner.py and snapraid-runner.conf.example. You can download the latest release as a zip file or run the commands below. Make sure to put them somewhere you will remember. I store mine in a folder called scripts.
wget https://raw.githubusercontent.com/Chronial/snapraid-runner/master/snapraid-runner.conf.example
wget https://raw.githubusercontent.com/Chronial/snapraid-runner/master/snapraid-runner.py
With these downloaded, let's get them configured for our system and have peace of mind when the corn job runs. We can either rename or make a copy of the conf.example file. I am just going to rename mine to keep it simple.
We will want to change the executable variable to /usr/bin/snapraid and change the config path to /etc/config. You can change a few other things, such as the deletethreshold, email, and scrub.
We need to test that this works correctly and then create the cronjob. Below is the command to test if you are in the same directory as the script.
sudo python3 snapraid-runner.pyNow, let's build the cronjob to run nightly. You may need to type 1 for the nano editor if you can't access crontab.
sudo crontab -eOnce you are in the editor, add the configuration below to the bottom of the file. This will run SnarpRAID every day at 4 am according to the time on your server.
00 04 * * * sudo python3 /this/is/your/path/snapraid-runner.py -c /this/is/your/path/snapraid-runner.confWe will want to change the executable variable to /usr/bin/snapraid and change the config path to /etc/config.
Conclusion
Well, that is it. If you followed along, you now have a drive pool the size of all the drives you added, and you are configured to make sure that if you lose a drive, you can rebuild. Remember, this is not a backup and does not follow the 3-2-1 rule. This is merely making sure that in the event a drive fails, you can rebuild without losing anything. Don't forget to subscribe and join us on Discord. Until next time, have fun, and don't forget to explore and learn. If you haven't already. Until next time have fun and don't forget to explore and learn.


Discussion