

There are already great tools out there like FileFlows, Tdarr, and even Emby that can handle conversions for you. But half the fun of a homelab is building something yourself. If you’ve been curious about n8n and want a small, hands-on project for a quiet afternoon, this is a good place to start.
This setup finds non-MP4 video files, converts them to MP4, logs detailed results for each one, and sends a report into n8n for storage or automation. It uses one bash script and one small workflow, but the design makes it easy to expand or maintain.
1. Configuration and environment setup
At the top of the script, we define the default paths and key variables that control how everything runs:
DEFAULT_WATCH="/mnt/media/Example"
TMP_DIR="/mnt/storage/utilities/tmp_convert"
LOG_DIR="/mnt/storage/utilities/logs"
RESULTS_FILE="/tmp/encode_results_$$.json"
LOCK_FILE="/tmp/encode_results.lock"
NTFY_URL="https://ntfy.example.com/video-encode"
These tell the script where to find videos, where to write temporary conversions, where to save logs, and how to send notifications. The results file includes the process ID so that every run is unique and cannot overlap.
After defining them, the script creates the required folders and clears any leftover temporary files older than thirty minutes:
mkdir -p "$TMP_DIR" "$LOG_DIR"
echo "[]" > "$RESULTS_FILE"
find "$TMP_DIR" -type f -name "*_tmp_*.mp4" -mmin +30 -delete 2>/dev/null || true
This ensures the environment is clean before each run begins.
2. Command-line controls
The script accepts two flags to change its behavior.
The -d flag runs it in dry mode so it will simulate conversions without replacing files. The -p flag changes how many files can process at once. For example, -p 6 means six encodes will run in parallel.
This logic is handled with a short argument parser:
while getopts ":dp:" opt; do
  case $opt in
    d) DRY_RUN=1 ;;
    p) PARALLEL="$OPTARG" ;;
    \?) echo "Invalid option: -$OPTARG" >&2; exit 2 ;;
    :) echo "Option -$OPTARG requires an argument." >&2; exit 2 ;;
  esac
done
If you provide a folder after the flags, the script uses that folder instead of the default watch path.
3. Startup notification and file discovery
Once setup is complete, the script sends a notification that the process has started. It uses curl to post a simple message to ntfy with the hostname and folder being scanned:
curl -s -H "Title: 🎬 Encoding Started" -H "Priority: 3" \
  -d "Scanning for files in: $WATCH_DIR on homelab-server" "$NTFY_URL"
Then it searches for all files that are not already MP4:
mapfile -d '' FILES < <(find "$WATCH_DIR" -type f \( -iname "*.mkv" -o -iname "*.mov" -o -iname "*.avi" -o -iname "*.flv" -o -iname "*.ts" \) -print0)If none are found, it prints a small JSON object that says no files were detected, sends a “no files found” notification, and exits gracefully.
4. The worker function
The main work happens inside a function called worker. Each file passes through it independently, and multiple workers can run at the same time.
worker() {
  FILE="$1"
  BASENAME=$(basename "$FILE")
The worker sets up a unique temporary file path and a timestamped log file:
RAND_SUFFIX=$(tr -dc 'A-Za-z0-9' </dev/urandom | head -c 5)
TMP="$TMP_DIR/${BASENAME%.*}_tmp_${RAND_SUFFIX}.mp4"
TS=$(date +"%Y-%m-%d_%H-%M-%S")
LOG="$LOG_DIR/${BASENAME%.*}_${TS}.log"
OUT="${FILE%.*}.mp4"
It validates that the source has a duration and size greater than zero using ffprobe and stat. If either test fails, it writes a small JSON object to the results file and skips the file.
Then it calculates a target bitrate that is half of the original, but never lower than 200 kilobits per second:
ORIG_BPS=$(( SIZE_BYTES * 8 / DURATION_INT ))
TARGET_KBPS=$(( ORIG_BPS * 50 / 100 / 1000 ))
[ "$TARGET_KBPS" -lt 200 ] && TARGET_KBPS=200
The encoder is chosen based on GPU availability.
If an NVIDIA GPU is detected, the script uses hevc_nvenc.
Otherwise it uses libx265 with a medium preset.
Subtitles are also handled here. The script checks for an English subtitle track and, if it is text based, converts it to mov_text for MP4 compatibility. Image subtitles are skipped and recorded in the log.
Finally, ffmpeg runs the conversion:
ffmpeg -hide_banner -y -nostats -i "$FILE" \
  "${MAP_OPTS[@]}" \
  "${VIDEO_OPTS[@]}" -c:a aac -b:a 128k "${SUB_OPTS[@]}" \
  -movflags +faststart "$TMP" 2> "$LOG"
If ffmpeg fails or the temporary file does not appear, the worker marks the file as failed.
The new file replaces the old one atomically and the space saved is recorded in megabytes. All writes to the shared results file use flock and jq to ensure multiple workers never overwrite each other.
5. Running workers in parallel
After the worker function is defined, the script feeds every file path into it through xargs. The number of simultaneous workers depends on the parallel variable:
printf '%s\0' "${FILES[@]}" | xargs -0 -n 1 -P "$PARALLEL" bash -c 'worker "$1"' _This line runs each file through the worker and waits for all to complete before continuing.
6. Building the summary report
Once all workers are finished, the script collects totals from the results file using jq. It counts how many succeeded, failed, skipped, or were part of a dry run, and sums the total space saved:
TOTAL_SAVED=$(jq '[.[] | select(.status=="success" or .status=="dryrun") | .saved_mb] | add // 0' "$RESULTS_FILE")
SUCCESS_COUNT=$(jq '[.[] | select(.status=="success")] | length' "$RESULTS_FILE")
The data is then formatted into a single JSON summary that includes the folder name, totals, and per-file details. That summary is printed to standard output or stdout so n8n can capture it.
7. Completion notification and cleanup
After printing the summary, the script sends a completion message through ntfy that shows how many files succeeded, failed, or were skipped, along with the total space saved.

Finally, it cleans up any temporary files left behind:
find "$TMP_DIR" -type f -delete 2>/dev/null || trueAt this point, every log and result is stored, and the environment is ready for the next scheduled run.
You can download and see the entire bash script here:
8. Integrating the script with n8n
The script is written to work directly with n8n using the Execute Command node.
A simple workflow can automate it completely.

Step one uses a Schedule Trigger to start the job on a regular interval.
Step two runs the bash script and captures its JSON output.
Step three uses a Code node to parse the summary, format readable messages, and extract important values such as total files converted and total space saved.
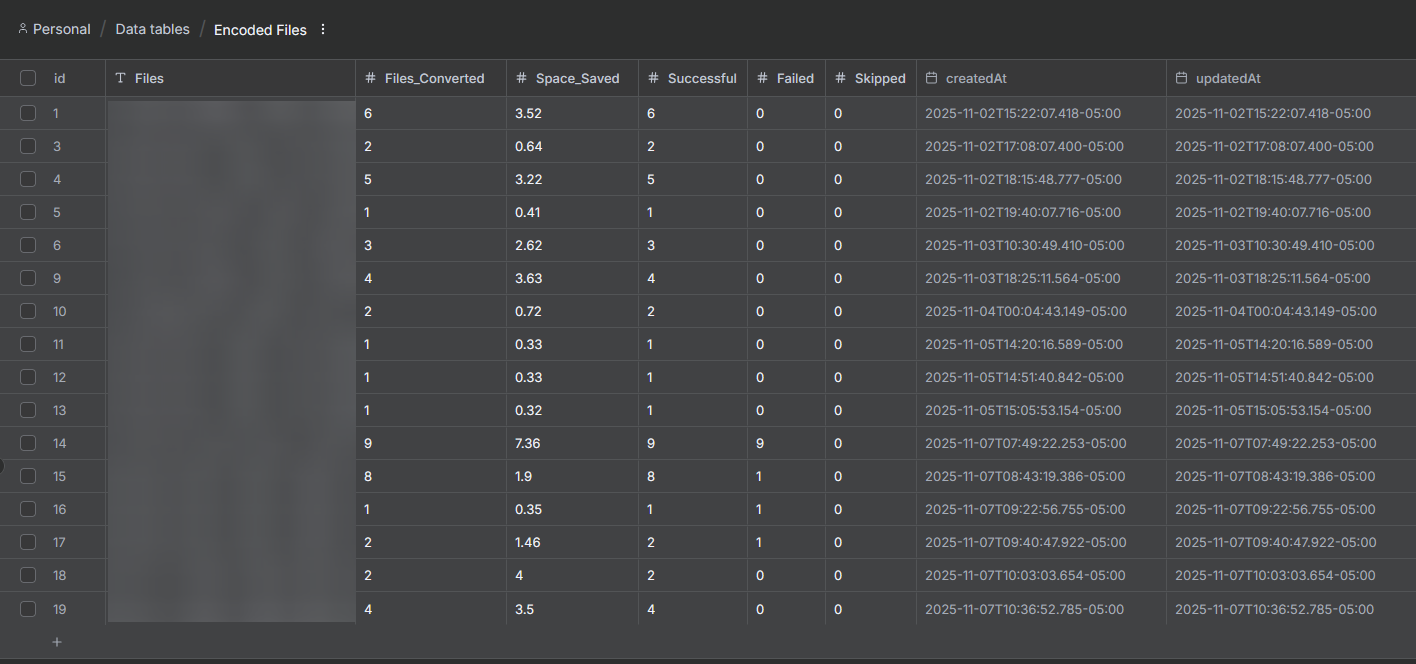
Step four stores each run in a Data Table for history and dashboards.
Because the script already outputs structured JSON, n8n can read it without extra parsing. You can also connect an HTTP Request node to forward notifications to Discord or another ntfy topic.
You can download and see the entire n8n workflow json here to import.
9. Why this design works but isn't practical
The script handles all the encoding and file management while n8n takes care of scheduling, transformation, and storage. Each part does its own job, which keeps the whole setup simple to understand and easy to maintain.
You can change encoder settings, add new notifications, or expand the summary with more information without touching the rest of the workflow. Everything stays modular and predictable. The result is a complete, self-contained system that keeps your media library consistent and organized.
That was fun, but expect to tweak the script from time to time. Certain files will probably need manual handling or code changes. You can check your logs folder for failures or even modify the script to let you know what fails and where.
Final Notes and Thoughts
Is this completely unnecessary? Probably. But it was a fun build that taught me more than I expected. I learned how flexible ffmpeg really is, how much control you can get from a few lines in the terminal, and how easily n8n can turn a local script into a repeatable automation.
There are plenty of tools that already do this, but this project was a learning experience more than anything. Seeing the workflow run, report, clean up and send notifications on its own is satisfying in a way that clicking a preset button never is. It reminded me why homelabs exist in the first place. To experiment, break things, fix them, and enjoy the process of making something work exactly how you want it to. Will it replace FileFlows for me? I'm optimistic but we will see!


Discussion