

If you're new to AI image generation, I've got just the thing. A super easy-to-use tool that's perfect for getting started!
I've tried out lots of different tools over the past couple years, and Fooocus is definitely my top pick. It's really simple, yet gets amazing results! Plus, it's perfect for beginners like you, who want to dive in without feeling overwhelmed. So here's what you're gonna need to be most sufficient using Fooocus to generate images, like this one that I used in the thumbnail of this article.
What you Need to Run Fooocus in Docker
- A computer with Linux and Docker installed. I use Ubuntu but PopOS is a good one too if you need a good distro with a Desktop GUI.
- A GPU - NVIDIA is preferred as it is the only GPU brand I have experience with. I use a ASUS ROG STRIX GeForce RTX 2080TI-O11G Overclocked. Yeah, I know, it's a mouth full. The more VRAM the card has, the better. Mine has 11GB of VRAM.
- 32GB of RAM - Not necessary but the more RAM you have the better as always. Most AI utilizes VRAM (from your GPU) so this isn't usually a big deal.
If you need help installing Docker, you can check out our guides as we cover that in great detail.
Why Docker?
Well, have you tried installing AI apps on bare metal? It can be pretty cumbersome. Docker packs everything you need into one image and does all the work for you allowing you to install it in just a few minutes. Pretty amazing!
Install Fooocus With Docker Compose
services:
  app:
    image: ghcr.io/lllyasviel/fooocus
    ports:
     - "7865:7865"
    environment:
      - CMDARGS=--listen    # Arguments for launch.py.
      - DATADIR=/content/data   # Directory which stores models, outputs dir
      - config_path=/content/data/config.txt
      - config_example_path=/content/data/config_modification_tutorial.txt
      - path_checkpoints=/checkpoints/
      - path_loras=/content/data/models/loras/
      - path_embeddings=/content/data/models/embeddings/
      - path_vae_approx=/content/data/models/vae_approx/
      - path_upscale_models=/content/data/models/upscale_models/
      - path_inpaint=/content/data/models/inpaint/
      - path_controlnet=/content/data/models/controlnet/
      - path_clip_vision=/content/data/models/clip_vision/
      - path_fooocus_expansion=/content/data/models/prompt_expansion/fooocus_expansion/
      - path_outputs=/content/app/outputs/    # Warning: If it is not located under '/content/app', you can't see history log!
    volumes:
      - /docker/fooocus:/content/data
      - /docker/fooocus/checkpoints:/checkpoints
      #- ./models:/import/models   # Once you import files, you don't need to mount again.
      #- ./outputs:/import/outputs  # Once you import files, you don't need to mount again.
    tty: true
    deploy:
      resources:
        reservations:
          devices:
            - driver: nvidia
              count: 1
              capabilities: [compute, utility]
This Fooocus Docker Compose gives Fooocus access to use your NVIDIA GPU which is exactly what we want. This way our GPU can do all the heavy lifting. It tells the container to map files to the /content/data where your models/checkpoints, loras and images can all be accessed.
Once you run the compose stack, it will deploy Fooocus web ui on port 7865.
Before you Launch Fooocus
When you deploy Fooocus for the first time, you will see this message in the logs:
Downloading:"https://huggingface.co/lllyasviel/fav_models/resolve/main/fav/juggernautXL_v8Rundiffusion.safetensors" to /checkpoints/juggernautXL_v8Rundiffusion.safetensors
JuggernautXL is about a 6.4gb model file and this is the standard model that ships with Fooocus. So it may take a while to download and start the app. Once it downloads the model, it will not have to do it again unless the model is removed from the checkpoints folder.
Hold off on launching the app just yet! As soon as the model downloads and the app initializes, please take a brief pause to grab an alternative model. Feel free to explore and experiment at your leisure, but I'm taking us on a different route for now.
Downloading Models from CivitAI
I'm going to jump right in and have you download a turbo model I really love. The reason for this is because it saves so much time generating images! Head over to CivitAI, create an account and then grab this model. Download the DreamShaper XL Turbo v2.1 model. Don't worry, CivitAI is free and so are the models. Place the model in the checkpoints folder we mapped in the Docker Compose. You should also see the juggernautXL model in there.
Fooocus UI Beginner Tour and Turbo Model Settings
To get started, tick the "Advanced" option to unlock customization options. Feel free to tweak settings like resolution, style, and more, just be aware that adjusting advanced settings can significantly impact performance, so it's recommended to start with a basic configuration and experiment once you become familiar with the software.

However, because we are using a turbo model we need to change some settings! So tick the "Advanced" option to unlock customization options. Feel free to tweak settings like resolution, style, and more, just be aware that adjusting advanced settings can significantly impact performance, so it's recommended to start with a basic configuration and experiment once you become familiar with the software.

For the best image quality, I prefer to use the "Quality" setting, which generates slightly more detailed and refined visuals, although this could come at the cost of increased processing time. Keep in mind that actual performance will depend on your system's specific hardware capabilities.
Go to the Models tab and change the Base Model to DramshaperXL.

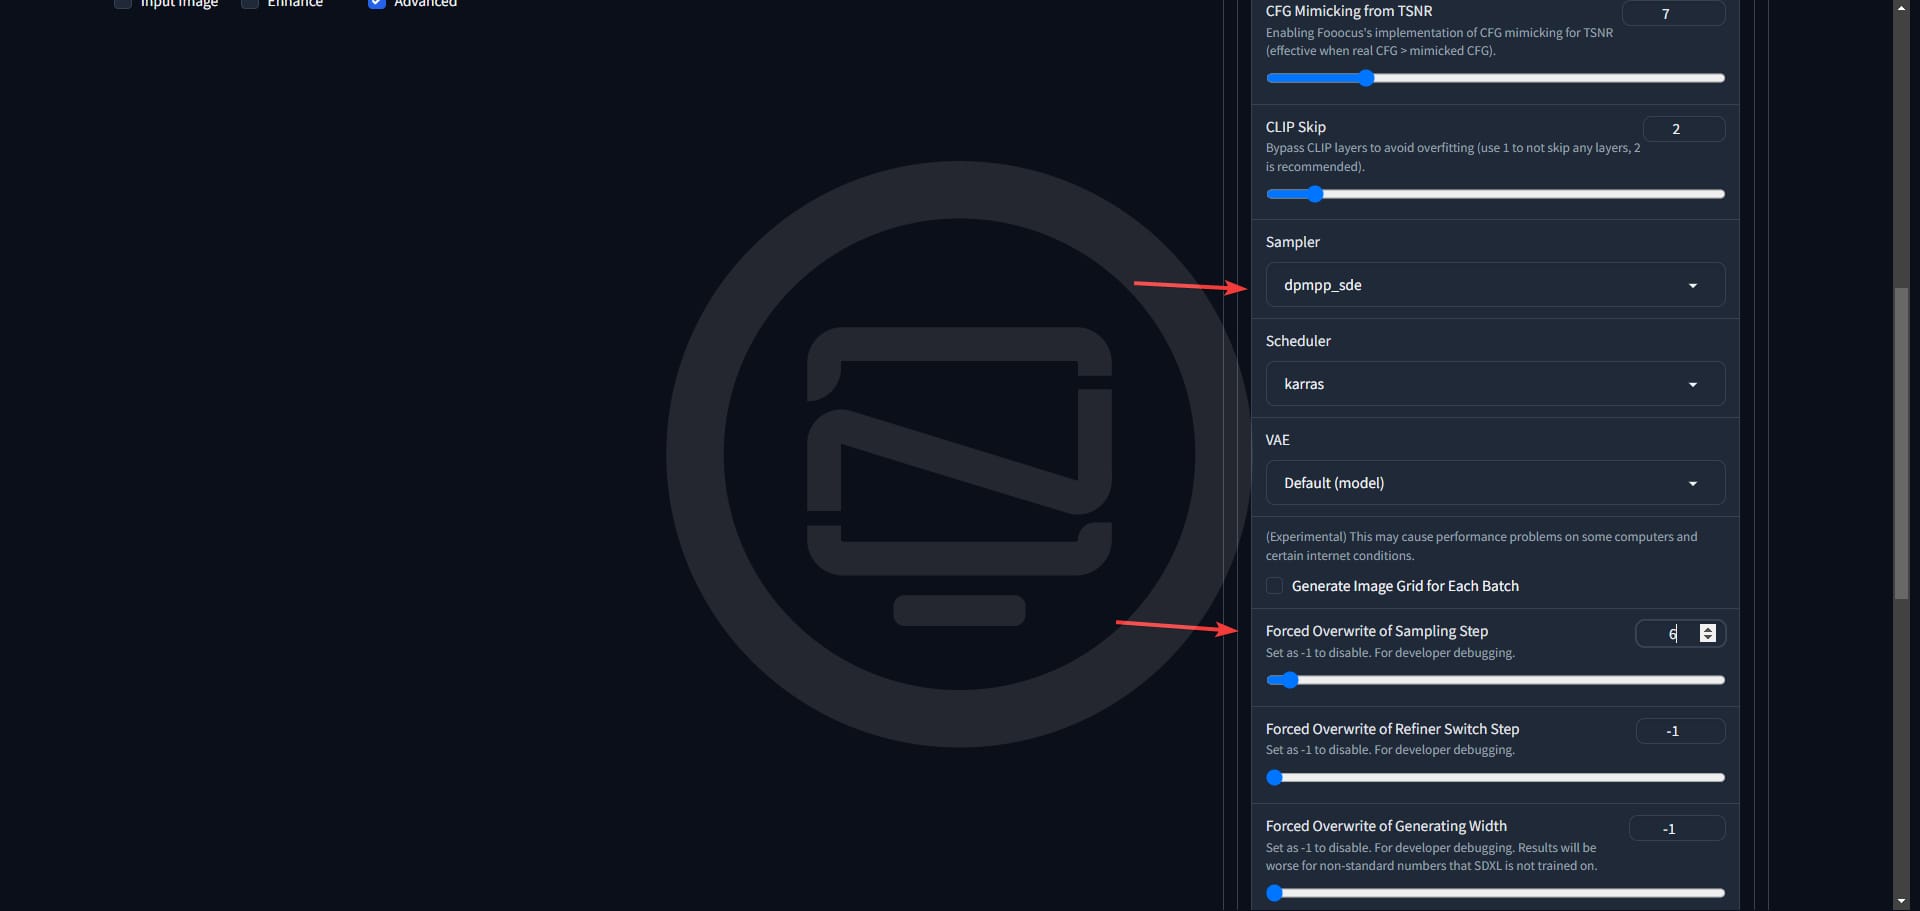
Now jump over to the Advanced tab and change a couple settings. First, enable "Developer Debug Mode" then scroll down a bit and change the Sampler to dpmpp_sde and down a bit further change the "Forced Overwrite of Sampling Step" to 6. That's right, we are generating images in only 6 steps! The hard part is done.

Be sure to leave Developer Debug Mode ticked then head back over to the Styles tab.
This tab is pretty self explanatory but this tab is what makes Fooocus so special. There are dozens and dozens of preset styles to choose from to help you be more creative with Fooocus.

By default, Fooocus enables these 3 styles: Fooocus V2, Fooocus Enhance and Fooocus Sharp. You can hover over each one to see an example of what they can do. No let's head back over to the main Settings tab.
Here you can select an image size and how many you want it to generate in one batch. I'll choose 1280x768 to get a nice 5:3 ratio image. I usually don't mess with the negative prompt unless I am doing portraits of people or I want a more specific image to not include something else. As you play with Fooocus you will understand more about how that works.
Start by typing a simple prompt into box and click Generate.
elegant abstract blobs, cellular, magical wallpaper background, dark purple and blue

That's fantastic! The output is truly impressive, showcasing an amazing diversity of designs and yielding some astonishingly awesome results! Total time: 20.06 seconds to generate these 2 images on the 208oTi.


Now that we have our background, you can use your favorite image editing tool to add text to it and create a thumbnail. I like to use PhotoPea. I'll grab the splash looking image and use that one. I'll lower the opacity of the image and place text over it using PhotoPea.

And there's the result. The colors match the Noted logo and it just looks awesome.
Stats for Nerds
Fooocus Logs
[Fooocus] Preparing task 2/2 ...
[Sampler] refiner_swap_method = joint
[Sampler] sigma_min = 0.0291671771556139, sigma_max = 14.614643096923828
Requested to load SDXL
Loading 1 new model
[Fooocus Model Management] Moving model(s) has taken 1.22 seconds
0% 0/6 [00:00<?, ?it/s]
17% 1/6 [00:00<00:03, 1.46it/s]
33% 2/6 [00:01<00:02, 1.44it/s]
50% 3/6 [00:02<00:02, 1.44it/s]
67% 4/6 [00:02<00:01, 1.44it/s]
83% 5/6 [00:03<00:00, 1.44it/s]
100% 6/6 [00:03<00:00, 1.74it/s]
100% 6/6 [00:03<00:00, 1.58it/s]
Requested to load AutoencoderKL
Loading 1 new model
[Fooocus Model Management] Moving model(s) has taken 0.24 seconds
[Fooocus] Saving image 2/2 to system ...
Image generated with private log at: /content/app/outputs/2025-01-23/log.html
Generating and saving time: 6.27 seconds
[Enhance] Skipping, preconditions aren't met
Processing time (total): 13.00 seconds
Requested to load SDXLClipModel
Requested to load GPT2LMHeadModel
Loading 2 new models
Total time: 14.37 seconds
[Fooocus Model Management] Moving model(s) has taken 0.63 seconds
Using nvtop in the CLI, I can see it's definitely using the GPU. Using ~5.5GB of VRAM with about 2.5GB that says locked into VRAM for ~10 minutes after the images have been generated.

Final Notes and Thoughts
That was a lengthy process, but I'm glad we got all the details covered! If you have any questions or need further clarification at any point, please don't hesitate to leave a comment below. I hope you find Fooocus an incredibly powerful tool for unleashing your creativity! And, as a bonus, I'll be sharing another article on ComfyUI soon which I also deployed using Docker!
This article is meant to get you up and running with a self-hosted version of Fooocus and AI image generation. For more comprehensive guides, tutorials, and in-depth exploration of Fooocus, be sure to visit our side blog at Mind Renders, where you'll find additional resources to help you master the tool.


Discussion