

We previously used the Pangolin tunneled reverse proxy application through third-party cloud hosting with Hosthatch VPS. Now, we're going to install and run it directly on our own server. If you want to read about using Pangolin with cloud hosting, click the article below, otherwise continue on for local installation.

Prerequisites
- A dedicated computer or server
- A static IP helps (one that does not change very often)
- Ports 80, 443 and 51820 open on your router and forwarded to the Pangolin server
- 1gb RAM (my instance uses about 600 mb on average)
- 25GB storage
- Domain name with access to the DNS records (very important)
This setup is similar to the configuration from Hosthatch, but we'll be installing Pangolin on our own home server using either an LXC container or traditional installation method instead of tunneled connections and IP obfuscation, which means your true public IP address will be visible. Basically, all we are doing different is removing the Newt installation steps and using a local site method.
Let's get into it!
Forward Ports on your Router
Log into your router and forward ports 80, 443 and 51820 to the IP of the server where Pangolin is installed on your home network.
Create an A Record for your Domain
Now we need to create an A record that points to our home IP address for our domain name. This can be different for you depending on what domain or DNS provider you use. I personally use Cloudflare. You can find your public IP by going here or if you're feeling geeky you can pop open a terminal on your network and use this command curl https://ipinfo.io/ip to show your IP.
Log into your Cloudflare account and choose the domain you want to use for Pangolin. Navigate to DNS and click "Add record"

- Type: A
- Name: your domain with no protocol
- IPv4 address: your home IP
- Proxy status: DNS only
By default, Cloudflare will enable proxy status so be sure to change it to DNS only so Let's Encrypt can see your home IP and issue the SSL certificates for your sub domains.
Click save and you're done here. I would wait a few minutes and ping the domain name to make sure it's pointing to your home IP before moving forward and installing Pangolin.
I think it's important to mention what type of Cloudflare encryption mode I am using. Without Cloudflare proxy, I found "Full" to work best.

Install Pangolin on Your Home Server
The Pangolin docs are well written and offer the best information when installing Pangolin for the first time. Things can change as development of the project moves forward so I suggest checking there first and foremost.
SSH into your server so we can being the install process. Once logged in via SSH, grab the latest one line install command provided by Pangolin. At the time of this guide, version 1.0.0-beta.12 was the latest release. Check here for the latest version!
wget -O installer "https://github.com/fosrl/pangolin/releases/download/1.0.0-beta.12/installer_linux_amd64" && chmod +x ./installerThis will download the installer to your server. Then simply run the installer command.
./installerYou will then be asked a short list of questions that guide you through the installation. (these may change as Pangolin is updated)
Pangolin CLI Installation Steps
- Enter your base domain (no subdomain e.g. example.com): yourdomain.com
- Enter the domain for the Pangolin dashboard: pangolin.yourdomain.com
- Enter email for Let's Encrypt certificates: [email protected]
- Do you want to use Gerbil to allow tunned connections (yes/no) (default: yes): yes
- Enter admin user email (default: [email protected]): [email protected]
- Create admin user password: Sup3rS3cRetP@55w0rd
- Confirm admin user password: Sup3rS3cRetP@55w0rd
- Disable signup without invite (yes/no) (default: yes): yes
- Disable users from creating organizations (yes/no) (default: no): no
- Enable email functionality (yes/no) (default: no): no
- Would you like to install and start the containers? (yes/no) (default: yes): yes
Obviously you want to use a legitimate domain name and email address. Use a strong password too.
The final step is to install and start the Docker containers packaged with Pangolin. These images are:
- Pangolin - The Fossorial system - with Pangolin at its core - is a self-hosted tunneled reverse proxy with identity and access management, designed to securely expose private resources through encrypted WireGuard tunnels running in user space. Think self hosted Cloudflare tunnels.
- Gerbil - Gerbil is a simple WireGuard interface management server written in Go. Gerbil makes it easy to create WireGuard interfaces as well as add and remove peers with an HTTP API.
- Traefik - Traefik is the leading open-source reverse proxy and load balancer for HTTP and TCP-based applications that is easy, dynamic and full-featured.
When it completes the install and starts the Docker containers, visit the Pangolin dashboard URL you provided in the installation walk-through.
Pangolin Dashboard Tour
When loading the Pangolin dashboard, you should notice that it has been secured by Let's Encrypt. If not, wait a few minutes and try loading in an incognito window. If you still don't get a cert, reboot the server and wait a few seconds.

Create an organization
When you login, you will be asked to create an organization. I named my organization "Home". Call it whatever you want and click "Create Organization".

Create a Site
Next you will be asked to create a Site. Think of a site as a server or computer where your apps are hosted. I named mine "Docker Server" since I'll be using this site on the server where my self-hosted apps are hosted at home.
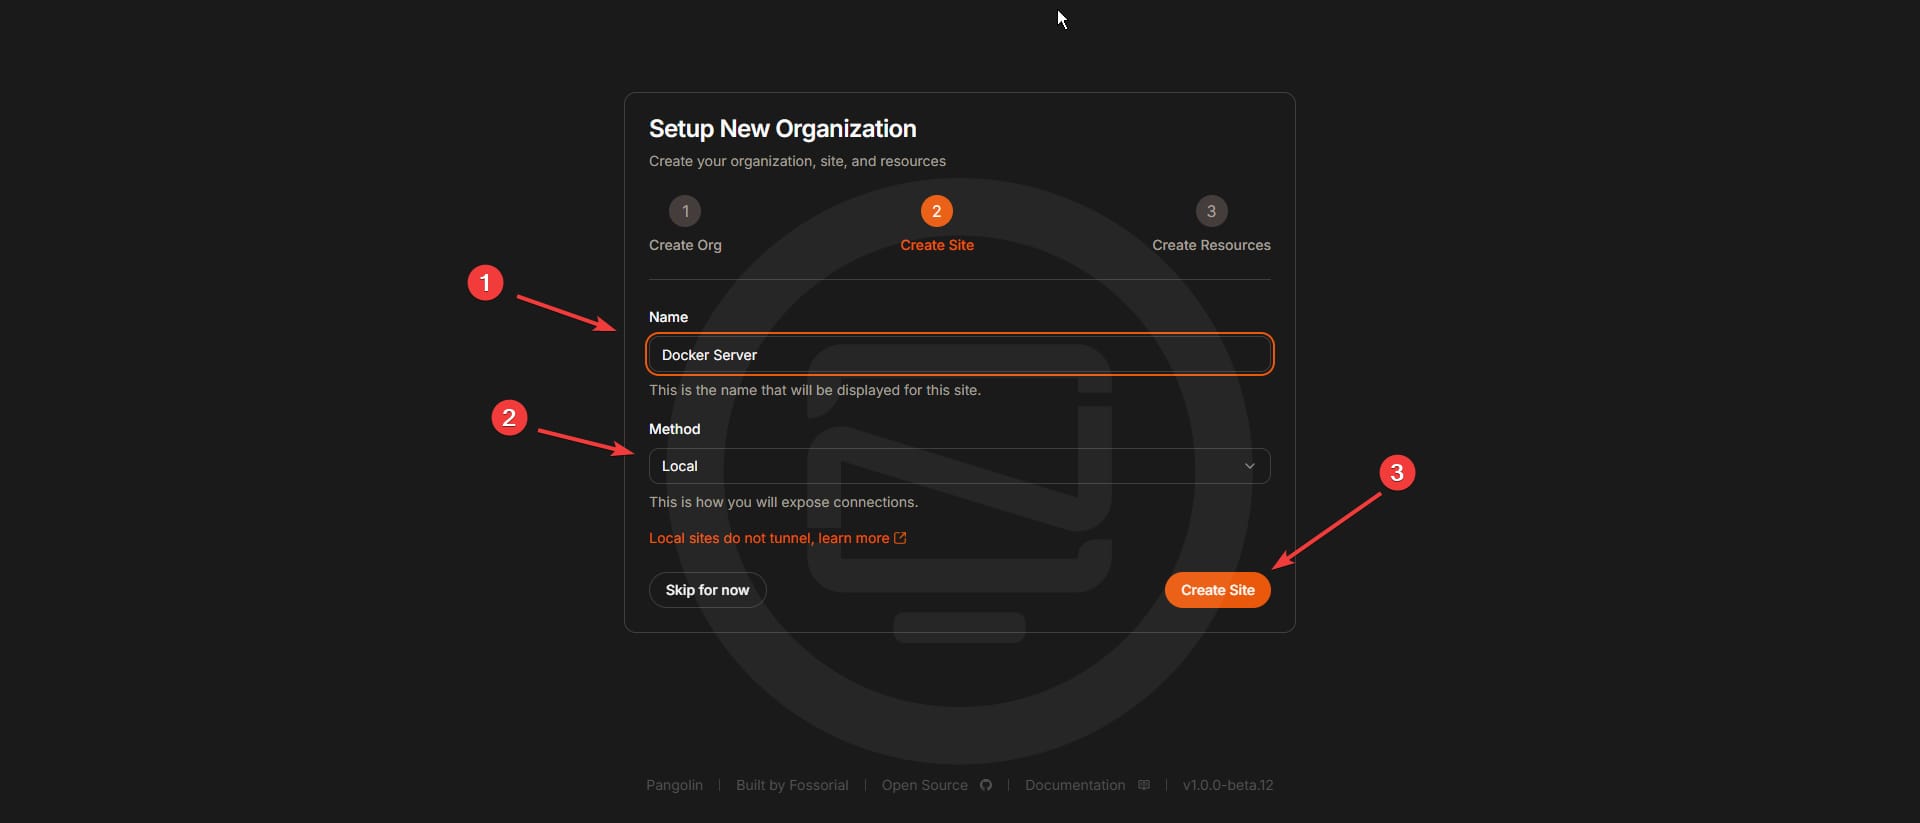
Choose "Local" as the method then click "Create Site".
Add a Resource and Create Sub Domains
On my server at home I have an app called Jellyfin that I love to use to watch home videos with the kids. I am going to go ahead and create a resource for this app so I can access it via my domain. For this we need to create a resource.

Give it a name that is similar to the application name. I'll name mine "jellyfin" and give the sub domain the same name. Then click on "Create Resource". The sub domain will be created and a call will be made for a Let's Encrypt SSL cert.
We aren't done yet though because Pangolin needs to know where the domain is being routed. For this we need to add the local IP and port of the app where your app is being hosted. I can see this in my Portainer instance.

In the Resource Connectivity page scroll down to the "Target Configuration" section and place the local IP and port of your self hosted app. Leave "Method" as http because we will get a certificate automatically. Be sure to press "Add Target" and "Save Targets" before you navigate away from this page.

Now when we go to our new sub domain, by default we will be presented with an authentication page to login before we get access to the app.

Is this not just amazing? Now all you have to do is log in with your Pangolin username and password and you'll get access to your self-hosted application over your own domain name!
Pangolin Authentication Methods
If you click on a resource, you will see a side panel where you can find the different authentication methods available. As if one was not enough?

This is just awesome. You can choose between standard username and password, single password and a 6 digit pin code. You can enable all of them or just one of them if you prefer!

To top it all off, you can even enable 2FA so when you do choose the username and password option it will also ask for an auth code.
What's coming Next for Pangolin?
- Full multi-domain support with SSO across domains (beta.9 includes a refactor of the auth system to support this).
- Automated Crowdsec installation. For now, you can manually add Crowdsec by following this community created guide
- IP and path based rules for bypassing Pangolin’s auth. For example, allow anything from
/api/*to bypass authentication checks.
Final Notes and Thoughts
So what happened there? Well, we basically avoided using Newt (Wiregaurd client) because we are using Pangolin locally on our own home server. Just don't forget, your home IP is exposed using this method. You can look into using wildcard certs if you do want to utilize Cloudflare proxy. This guide assumes you want to avoid using Cloudflare for anything other than a DNS.
I do ask if you have any questions to please ask on the Pangolin Github issue tracker, Discussions page or their Discord server.
Sponsor this amazing project! It's free, open-source and the developers are two brothers pouring their heart into this project. Click the link below to see options.

If anything, please stop by the Pangolin Github page and give the project a well deserved star!


Discussion