

I've been digging into some popular Reverse Proxy solutions, and I'm really impressed by what I've found. They all have their own strengths and weaknesses when it comes to simplicity and user-friendliness. But the latest contender has really caught my eye, thanks to its seamless setup process and super intuitive web interface. It's quickly become one of my top picks for Revers Proxy and that is Pangolin.
Want to run Pangolin locally? Click below for our comprehensive guide for running Pangolin using local mode!

What is Pangolin?
Pangolin is a powerful reverse proxy management server that streamlines identity and access control, making it easy to deploy and integrate with Traefik and WireGuard tunnel clients. Its clean UI and comprehensive features provide unparalleled flexibility for managing complex networks and securing private resources like self-hosted applications. One of Pangolin’s strengths is acting as a self-hosted Cloudflare Tunnel alternative, especially for punching through restrictive firewalls.

Pangolin has undoubtedly breathed fresh air into the Reverse Proxy landscape with its uncomplicated design and user-friendly interface. As someone who's worked extensively with proxy servers, I was impressed by how easily this tool can be set up and running, even for those without extensive technical expertise.
Pangolin can be hosted both locally (self-hosted) or remotely using cloud compute. In this article, I'll be showing you how to setup Pangolin using a $4 Hosthatch module with shared CPU allowing you to create a tunneled reverse proxy with authentication! This is me trying to venture away from Cloudflare DNS and try something new - so this is a big leap for me.

Hosthatch
High performance compute VMs, with dedicated CPU allocations and extremely high IOPS NVMe disks. Deploy in 16 edge locations, and deliver consistently high-performance to your users, regardless of where they are located.
Prerequisites
As I stated earlier, Pangolin can be hosted locally but for the sake of this guide, I'll be using Hosthatch. Here are a few things you will need to make Pangolin work effectively and efficiently.
- A dedicated computer, server or cloud vps with ports 80, 443 and 51820 open
- 1GB RAM (my instance uses about 650mb on average but I have 2GB total)
- 10-20GB storage
- Operating System : A Linux-based system with root access, utilizing Ubuntu or Debian distributions.
- Domain Configuration : A public domain name must be registered and pointed to your server's IP address.
- Certificate Registration : An email address is required for registering a Let's Encrypt certificate.
- Optional: SMTP Server Configuration (not required)

Setup a Hosthatch Module
When you setup a Hosthatch, I find it best to choose a location that's closest to you. When you register and log in, navigate to the "Create Server" page.

- Server Location: (Choose one closest to you)
- Server Type: NVMe Compute VMs
- Server Size: NVMe 2GB
- OS: Debian 12 x64
- Hostname: Your -host-name
This setup gives us the following specs for our Pangolin "server":
- 2GB RAM
- 1 CPU (shared)
- 11GB storage
- 1TB transfer
- 1 dedicated IP
Total cost: $4 per month! Not bad at all for a 2GB RAM VPS!
When you create the Hosthatch server, you will be taken to the Hosthatch dashboard where you can see all the details about the cloud server you just created.

Or you can find your servers under the "Resources" section on the left side navigation panel. Click on "Servers".
Create an A Record for your Domain
Now we need to create an A record that points to the servers public IP address for our domain name. This can be different for you depending on what domain or DNS provider you use. I personally use Cloudflare.
Log into your Cloudflare account and choose the domain you want to use for Pangolin. Navigate to DNS and click "Add record"

- Type: A
- Name: your domain with no protocol
- Content: your Hosthatch server IP
- Proxy status: DNS only
Click save and you're done here. I would wait a few minutes and ping the domain name to make sure it's pointing to your Hosthatch IP before moving forward and installing Pangolin.
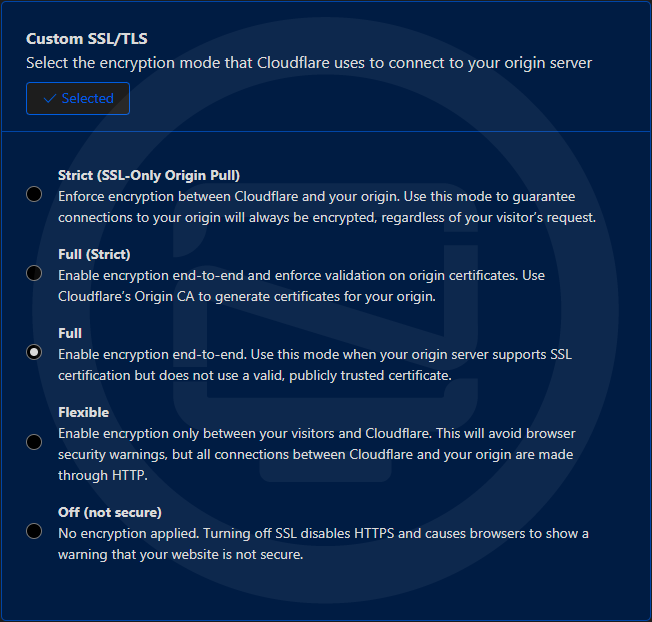
I will NOT be utilizing Cloudflare proxy simply because I am using 3rd party cloud hosting. I advise reading the Pangolin docs about setting up wildcard certs for that. However, that is outside the scope of this guide.
I think it's important to mention what type of Cloudflare encryption mode I am using. Without Cloudflare proxy, I found "Full" to work best.
Install Pangolin on Your Hosthatch
The Pangolin docs are well written and offer the best information when installing Pangolin for the first time. Things can change as development of the project moves forward so I suggest checking there first and foremost. Below I will walk you through the quick and simple way I installed Pangolin on my Hosthatch server.
You can SSH into your Hosthatch by using the password you chose as "root access" when you created your Hosthatch. Once logged in via SSH on your Hosthatch, grab the latest one line install command provided by Pangolin. At the time of this guide, version 1.0.0-beta.12 was the latest release. Check here for the latest version!
wget -O installer "https://github.com/fosrl/pangolin/releases/download/1.0.0-beta.12/installer_linux_amd64" && chmod +x ./installerThis will download the installer to your Hosthatch server. Then simply run the installer command.
./installerYou will then be asked a short list of questions that guide you through the installation.
Toggle to see Pangolin Installation Steps
- Enter your base domain (no subdomain e.g. example.com): yourdomain.com
- Enter the domain for the Pangolin dashboard: pangolin.yourdomain.com
- Enter email for Let's Encrypt certificates: [email protected]
- Do you want to use Gerbil to allow tunned connections (yes/no) (default: yes): yes
- Enter admin user email (default: [email protected]): [email protected]
- Create admin user password: Sup3rS3cRetP@55w0rd
- Confirm admin user password: Sup3rS3cRetP@55w0rd
- Disable signup without invite (yes/no) (default: yes): yes
- Disable users from creating organizations (yes/no) (default: no): no
- Enable email functionality (yes/no) (default: no): no
- Would you like to install and start the containers? (yes/no) (default: yes): yes
Obviously you want to use a legitimate domain name and email address. Use a strong password too.
The final step is to install and start the Docker containers packaged with Pangolin. These images are:
- Pangolin - The Fossorial system - with Pangolin at its core - is a self-hosted tunneled reverse proxy with identity and access management, designed to securely expose private resources through encrypted WireGuard tunnels running in user space. Think self hosted Cloudflare tunnels.
- Gerbil - Gerbil is a simple WireGuard interface management server written in Go. Gerbil makes it easy to create WireGuard interfaces as well as add and remove peers with an HTTP API.
- Traefik - Traefik is the leading open-source reverse proxy and load balancer for HTTP and TCP-based applications that is easy, dynamic and full-featured.
When it completes the install and starts the Docker containers, visit the Pangolin dashboard URL you provided in the installation walk-through.
Pangolin Dashboard Tour
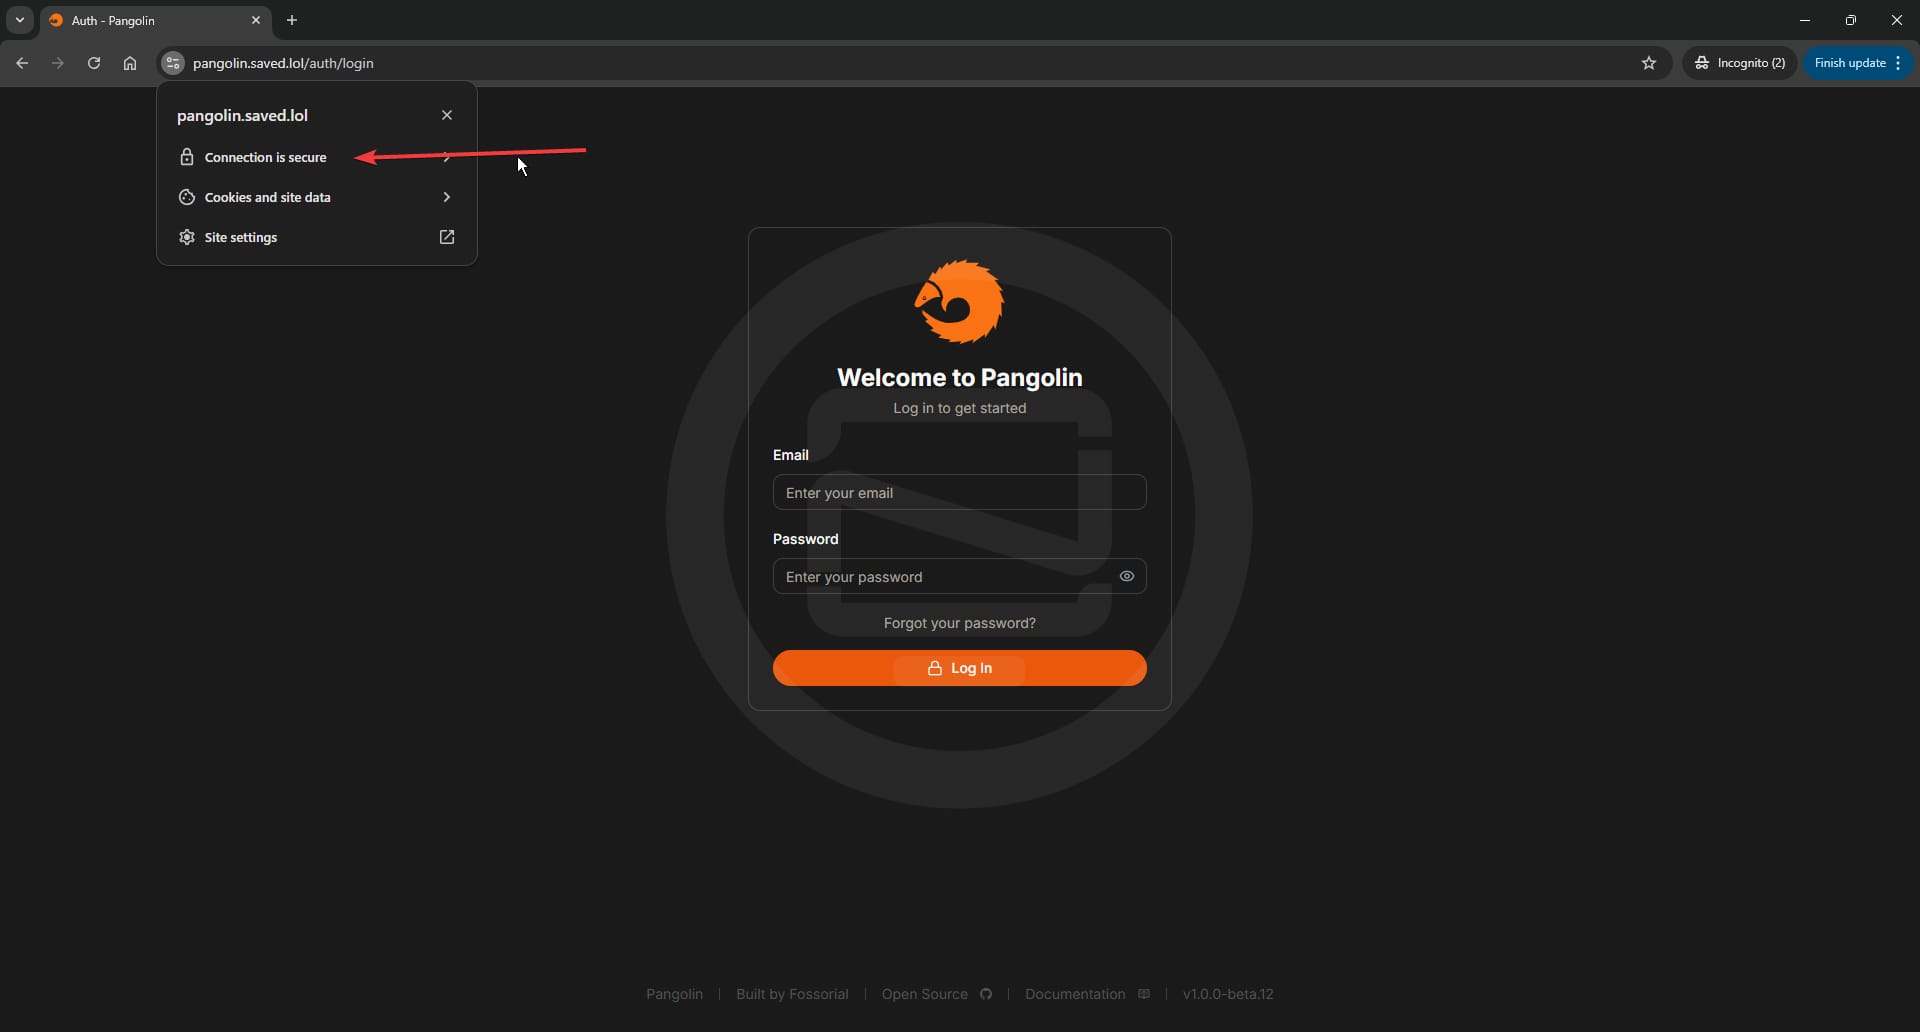
When loading the Pangolin dashboard, you should notice that it has been secured by Let's Encrypt. If not, wait a few minutes and try loading in an incognito window. If you still don't get a cert, reboot the server and wait a few seconds.
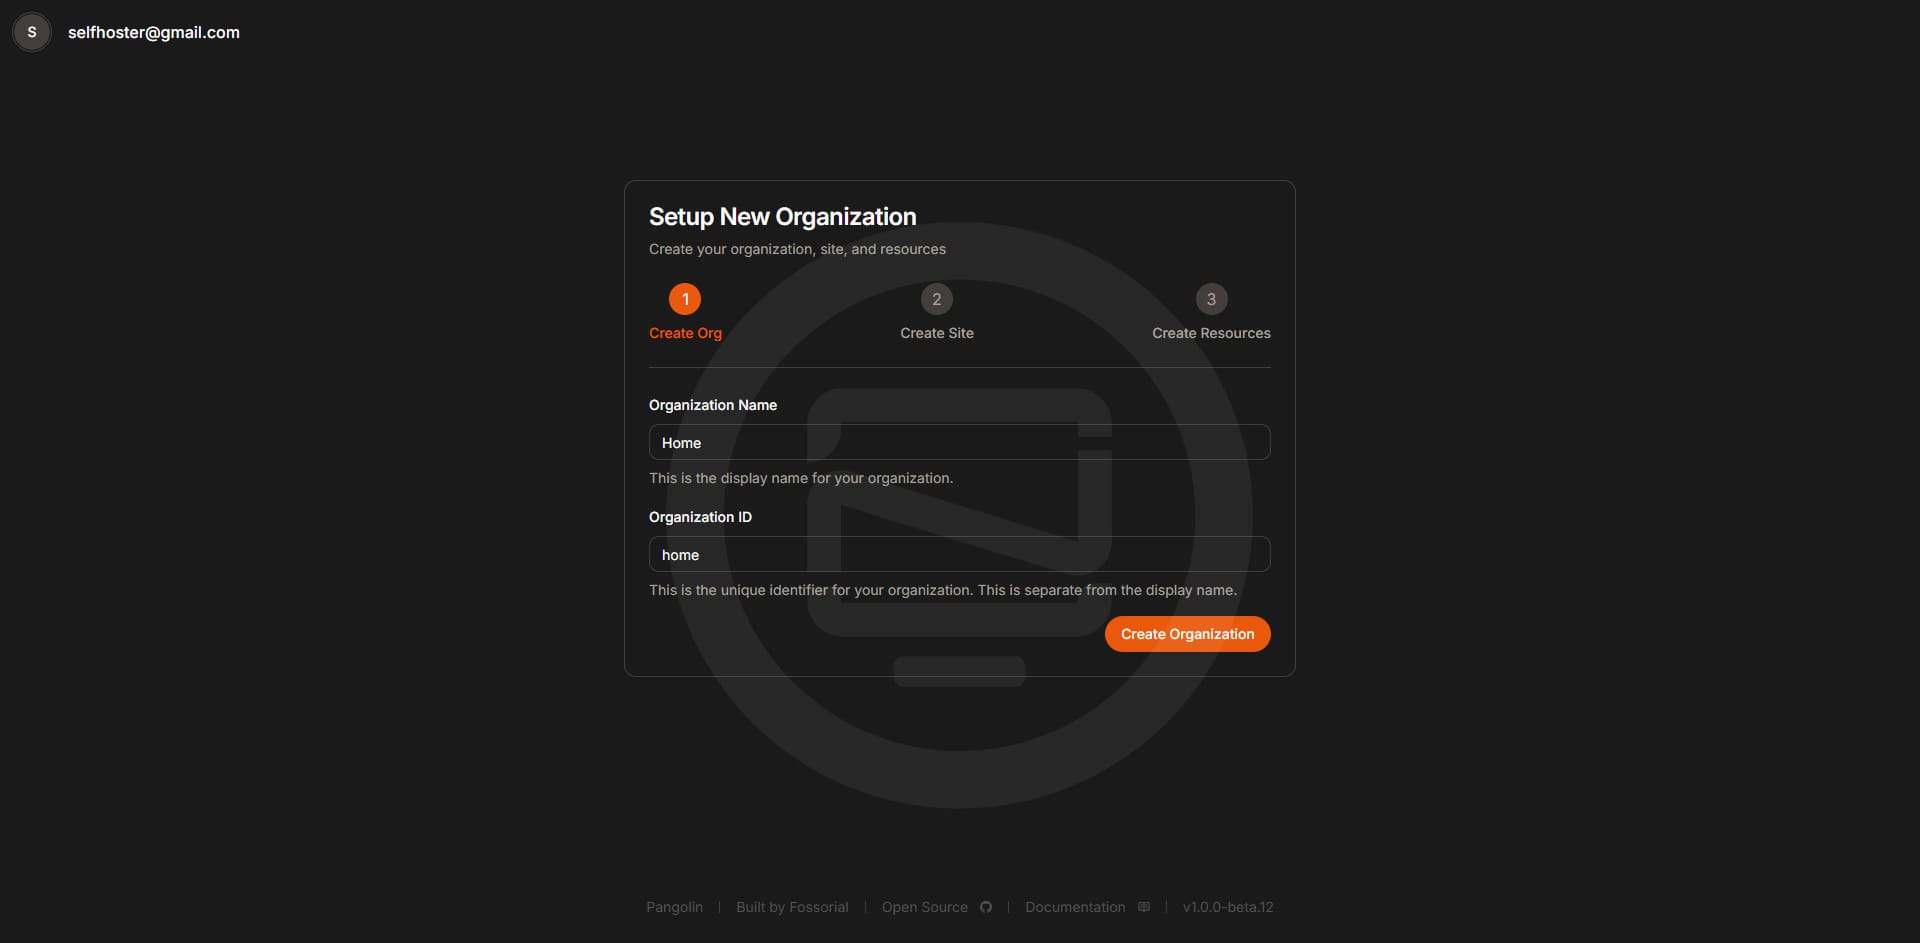
Create an organization
When you login, you will be asked to create an organization. Since I am using Pangolin to tunnel apps from my home server, I named my organization "Home". Call it whatever you want and click "Create Organization".
Create a Site
Next you will be asked to create a Site. Think of a site as a server or computer where your apps are hosted. I named mine "Main Server" since I'll be installing Newt on the server where my self-hosted apps are hosted at home.

You will need to copy down the Newt config and save it for later. The info there will be used to install Newt on the machine where your apps are being hosted. This way it can tunnel the apps using Wiregaurd under the hood. Click on "I have copied the config" then click "Create Site".
Install Newt on your app Host
To install Newt, it's super simple. There is an example Docker Compose on the Pangolin docs wiki. Here is the example:
services:
    newt:
        image: fosrl/newt
        container_name: newt
        restart: unless-stopped
        environment:
            - PANGOLIN_ENDPOINT=https://example.com
            - NEWT_ID=2ix2t8xk22ubpfy
            - NEWT_SECRET=nnisrfsdfc7prqsp9ewo1dvtvci50j5uiqotez00dgap0ii2
Drop this on the server where the apps are that you want to expose using Pangolin. Swap out the endpoint URL, Newt ID and Newt Secret with the ones we copied from the new site page. Then start the container and wait a few seconds.

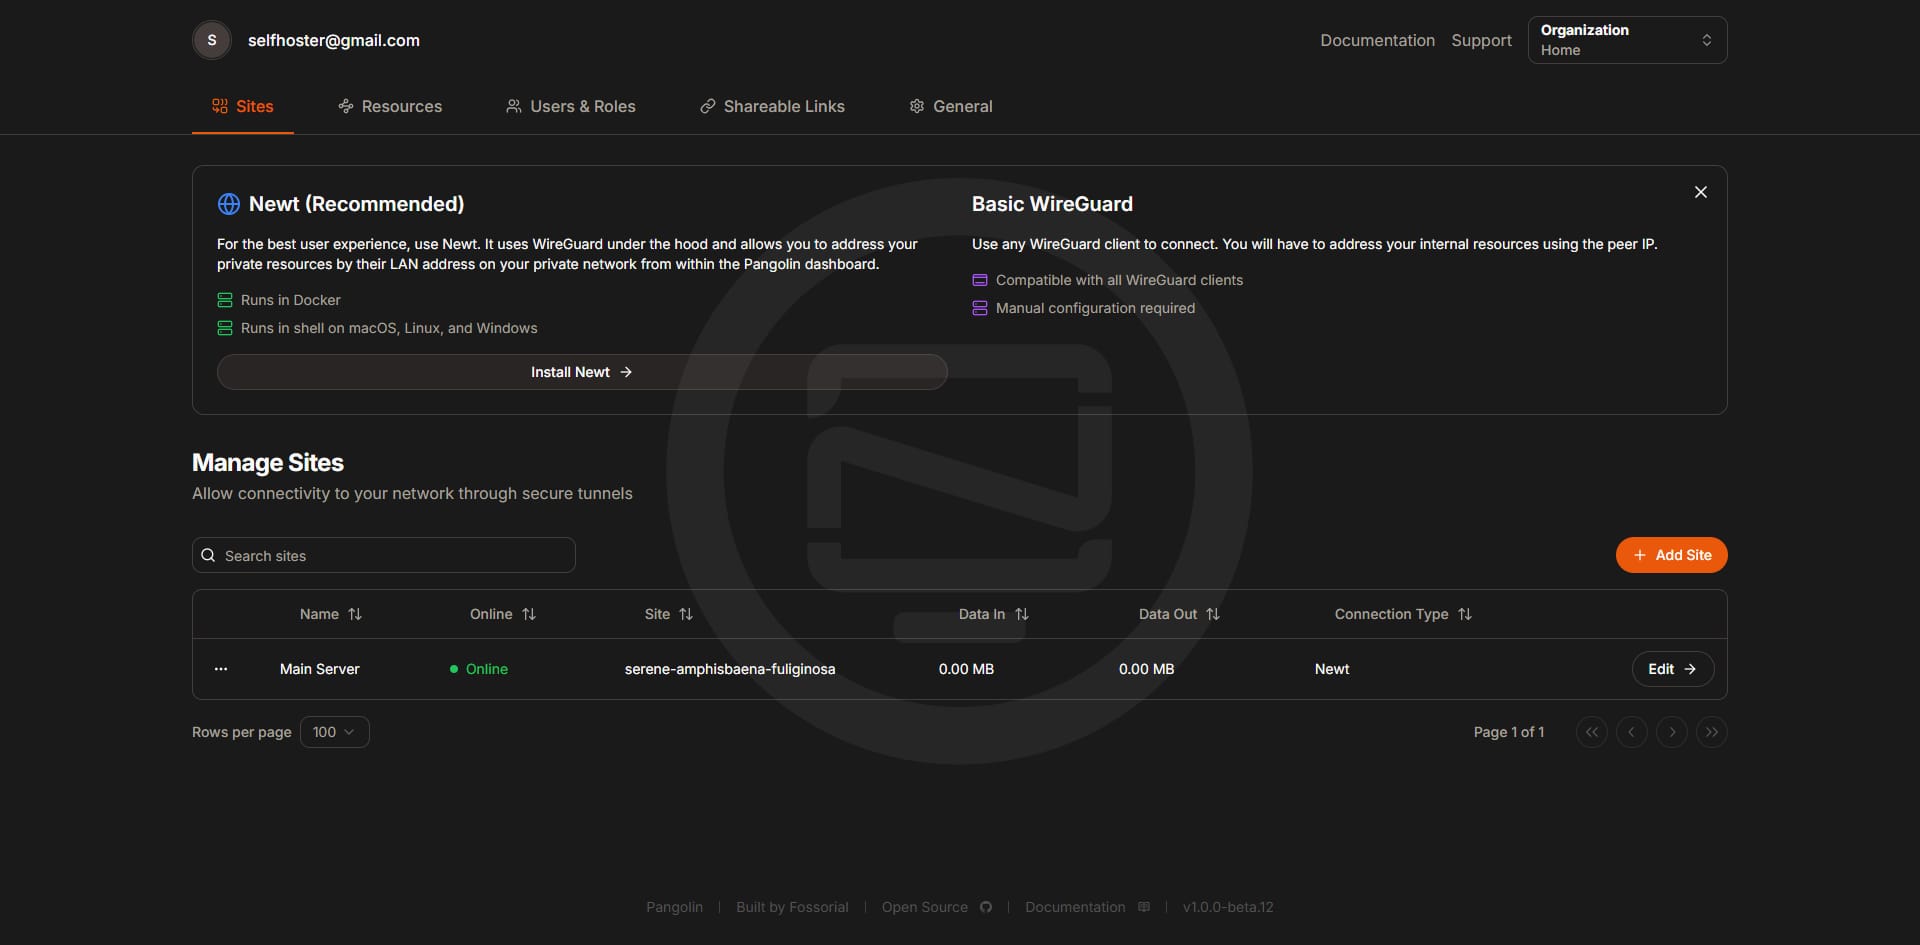
Before and after you install Newt on your server you will notice it will say offline or online.
When the site is good to go you will see it light up green and say "Online". This indicates that the tunnel has been made from the Hosthatch server to your machine at home and is now ready for resources or "sub domains" to be added for exposure.
Add a Resource and Create Sub Domains
On my server at home I have an app called Nexterm that I love to use as a web terminal. I am going to go ahead and create a resource for this app so I can access it via my domain. For this we need to create a resource.
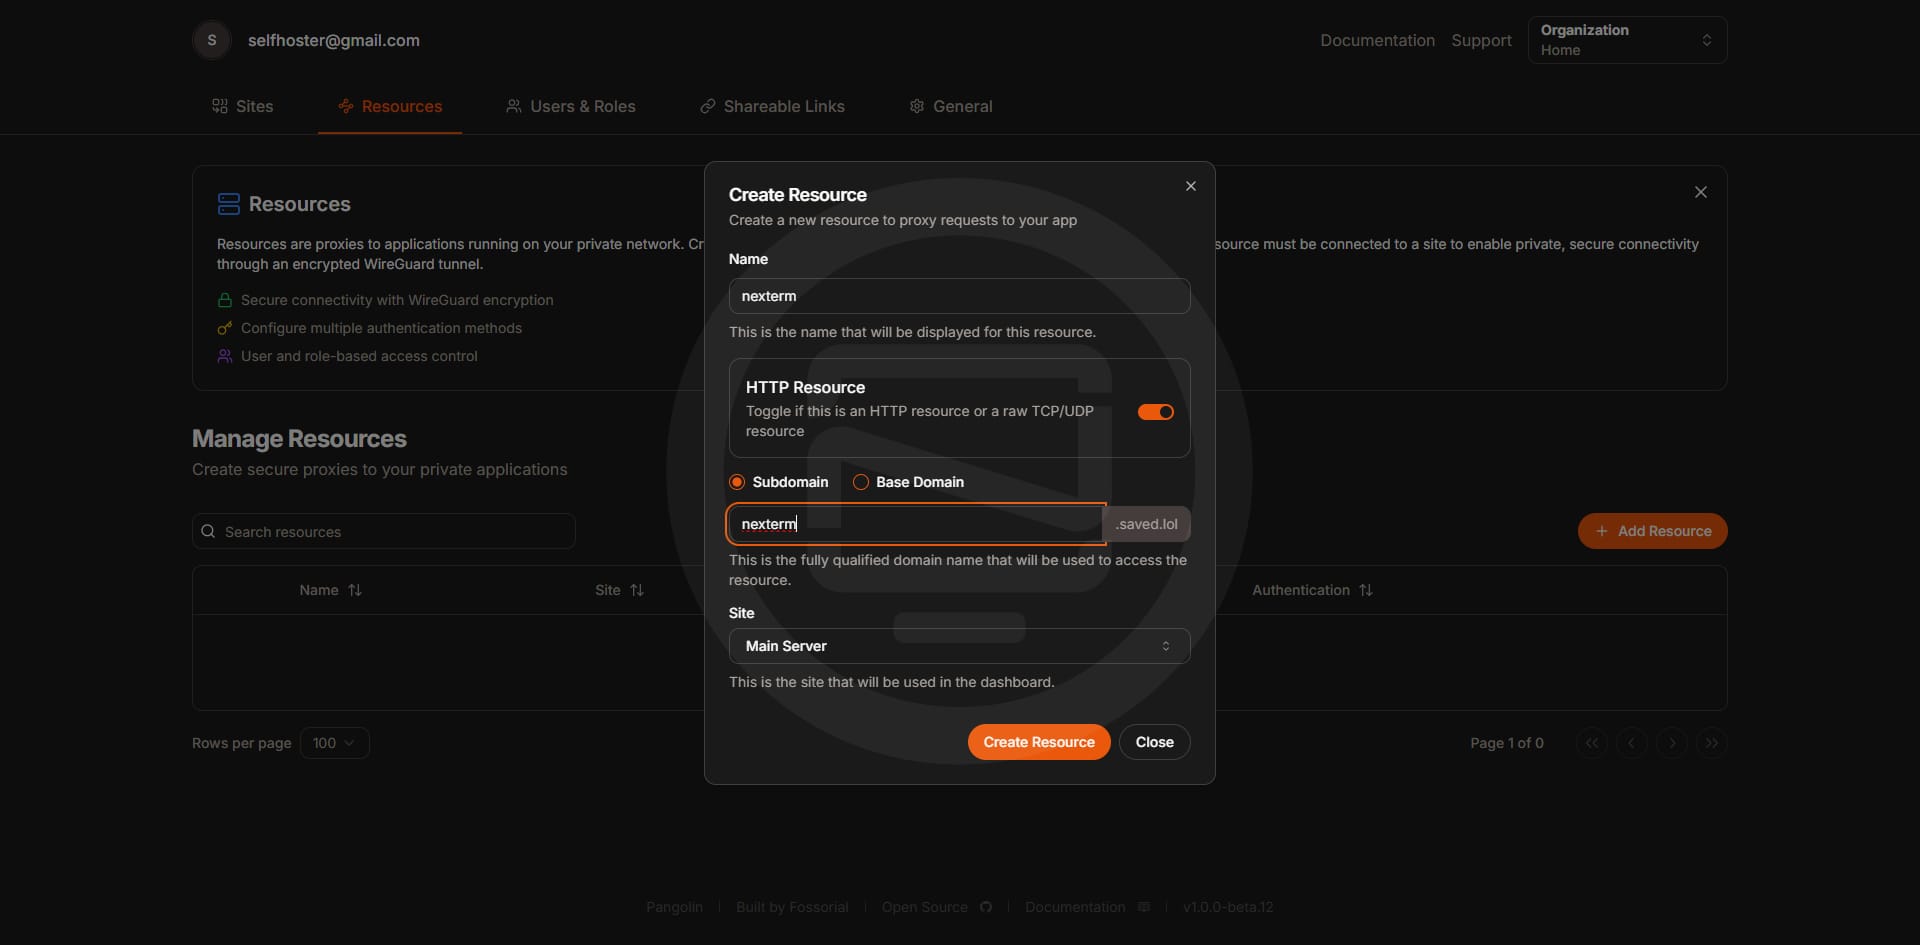
Give it a name that is similar to the application name. I'll name mine "nexterm" and give the sub domain the same name. Then click on "Create Resource". The sub domain will be created and a call will be made for a Let's Encrypt SSL cert.
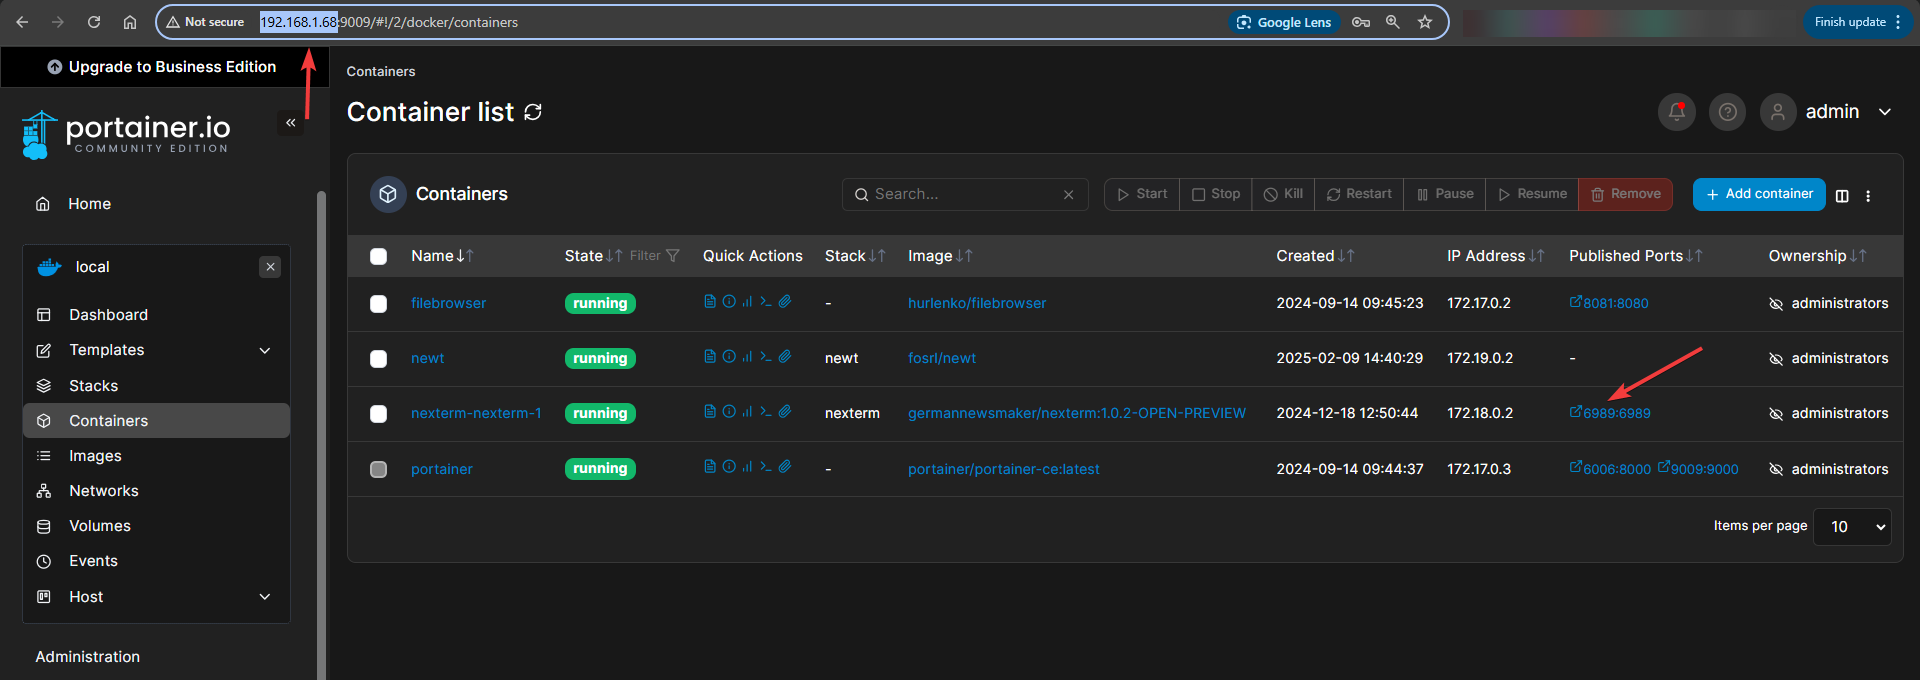
We aren't done yet though because Pangolin needs to know where the domain is being routed. For this we need to add the local IP and port of the app where your app is being hosted. I can see this in my Portainer instance.
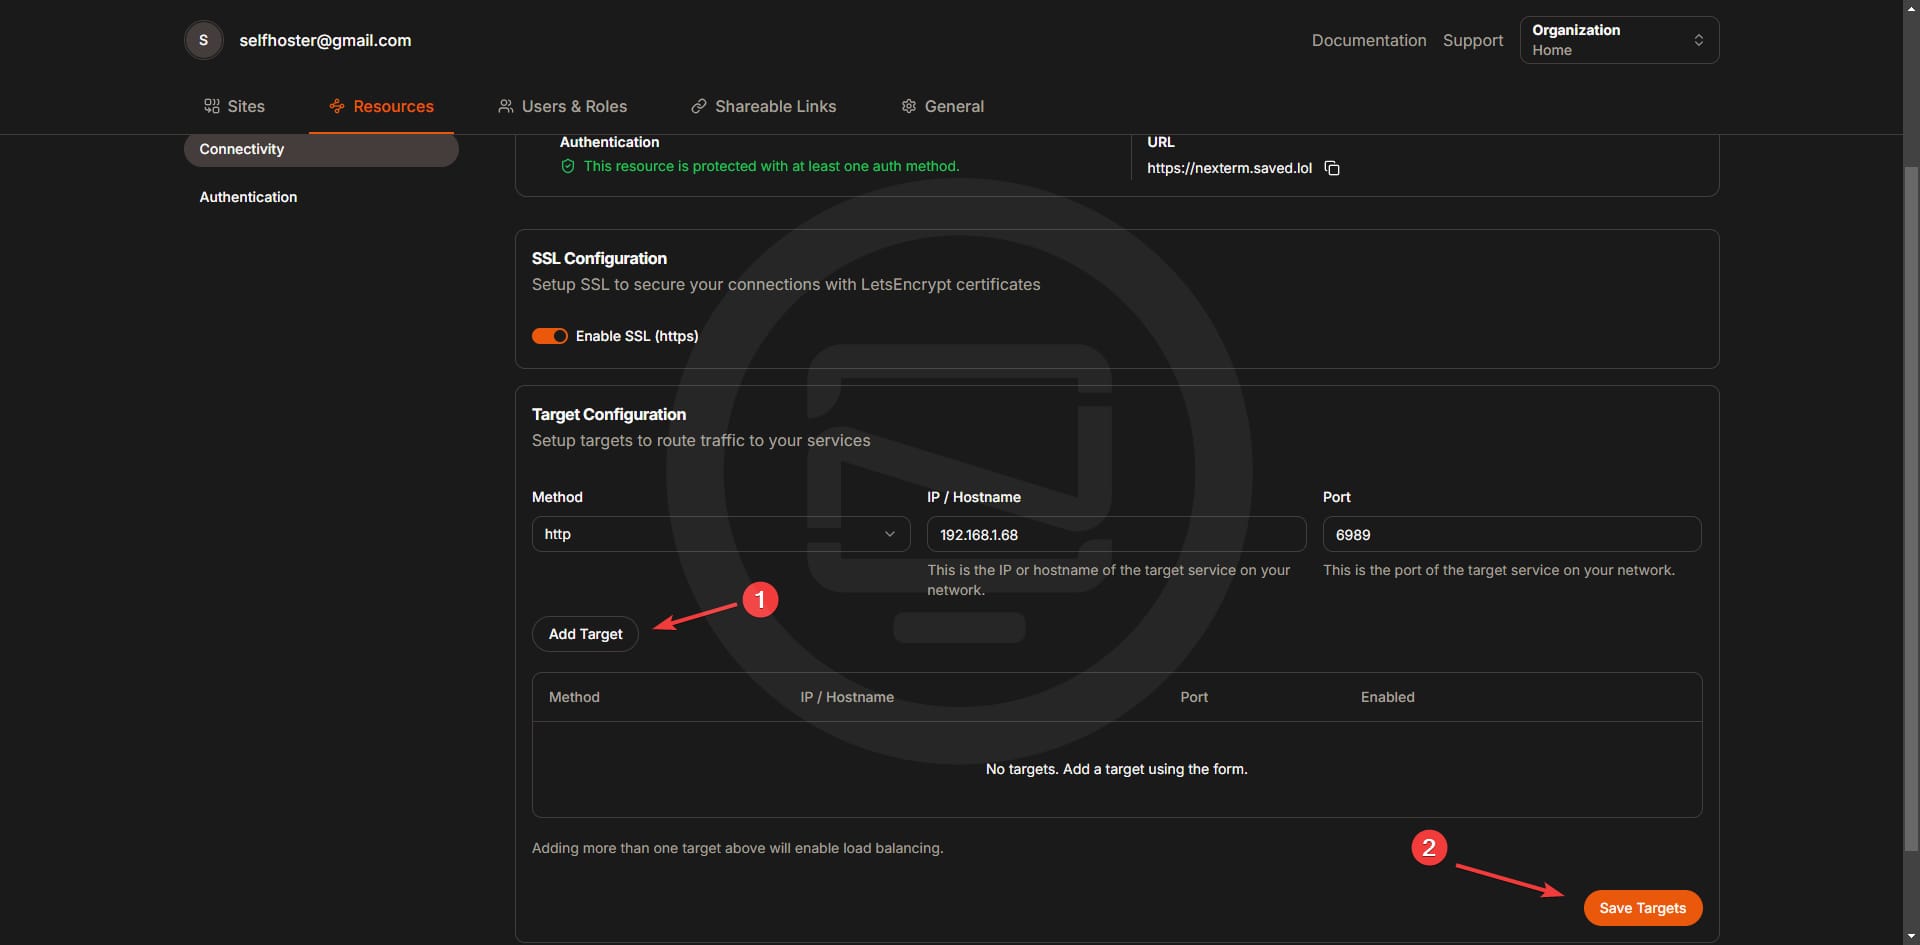
In the Resource Connectivity page scroll down to the "Target Configuration" section and place the local IP and port of your self hosted app. Leave "Method" as http because we will get a certificate automatically. Be sure to press "Add Target" and "Save Targets" before you navigate away from this page.
Now when we go to our new sub domain, by default we will be presented with an authentication page to login before we get access to the app.
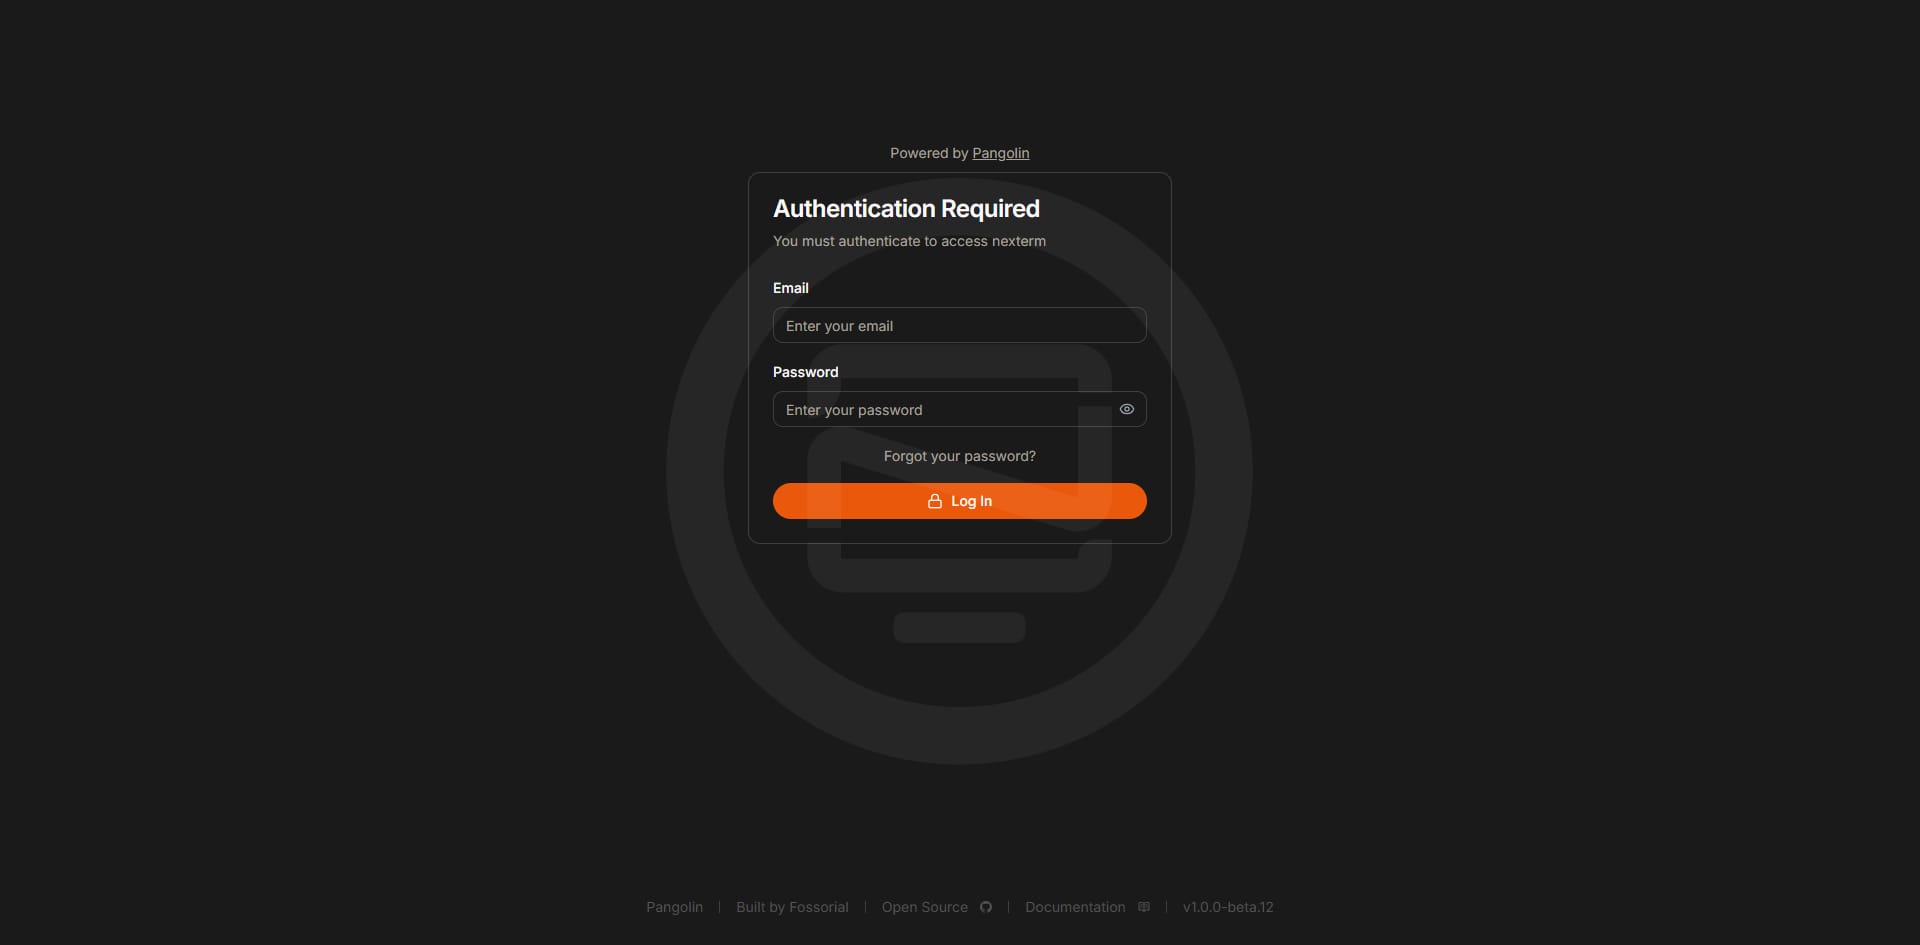
Is this not just amazing? Now all you have to do is log in with your Pangolin username and password and you'll get access to your self-hosted application over your own domain name!
Pangolin Authentication Methods
If you click on a resource, you will see a side panel where you can find the different authentication methods available. As if one was not enough?
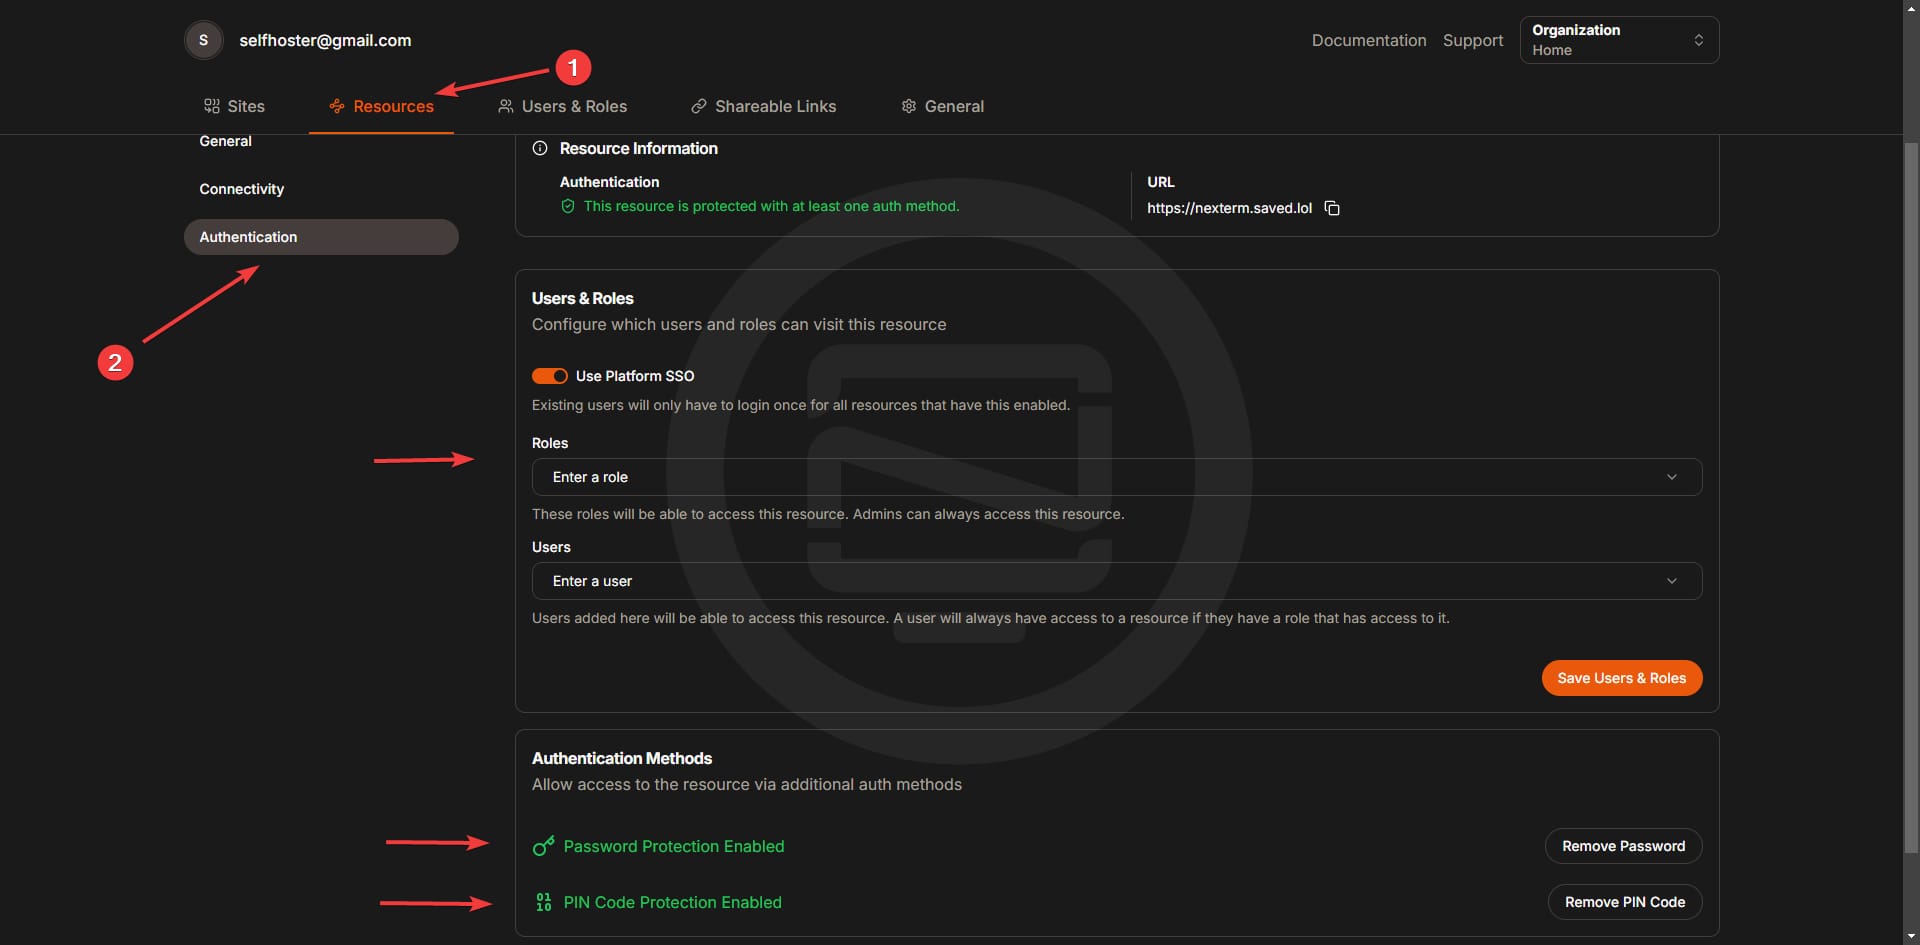
This is just awesome. You can choose between standard username and password, single password and a 6 digit pin code. You can enable all of them or just one of them if you prefer!
To top it all off, you can even enable 2FA so when you do choose the username and password option it will also ask for an auth code.
What's coming Next for Pangolin?
- Full multi-domain support with SSO across domains (beta.9 includes a refactor of the auth system to support this).
- Automated Crowdsec installation. For now, you can manually add Crowdsec by following this community created guide
- IP and path based rules for bypassing Pangolin’s auth. For example, allow anything from
/api/*to bypass authentication checks.
Final Notes and Thoughts
You can continue to add more resources that you want to expose using Pangolin. If you plan to add more than 10-15 sub domains I do recommend looking into wildcard certificates. This is well documented on the Pangolin wiki but also outside the scope of where I wanted to take this guide.
I'm thoroughly enjoying Pangolin. It's definitely one of my top picks from early in the year. Despite being relatively new, it's already shown impressive planning and execution. This has me incredibly proud to be supporting the project through GitHub, and I'm looking forward to seeing how it continues to grow.
I do ask if you have any questions to please ask on the Pangolin Github issue tracker, Discussions page or their Discord server.
Sponsor this amazing project! It's free, open-source and the developers are two brothers pouring their heart into this project. Click the link below to see options.

If anything please stop by the Pangolin Github page and give the project a well deserved star!


Discussion